Word styles: what they are and how to create and modify your own
A style is a named set of formatting (font, size, spacing…) that you apply in one click from Home › Styles. To change one, right-click the style › Modify: every paragraph that uses it updates at once. To create one, open the Styles pane (the small launcher arrow in the group) and click New Style, or expand the gallery and choose Create a Style.
You have a report with 40 headings and someone wants them in dark blue and one point smaller. So you go heading by heading: select, color, size… forty times. Then the table of contents, by hand. If that sounds familiar, you're using direct formatting where Word expected a style.
A style is a label with formatting instructions. Instead of painting each heading by hand, you hang the Heading 1 label on it and Word paints it for you. Change the instructions and Word repaints all 40 headings on its own. It's like a team uniform: you don't dress each person every morning; you change the uniform and everyone changes.
Here you learn to apply, modify and create styles, and to see why they're the foundation of the automatic table of contents and of any template, whether you wrote the text or ChatGPT did.
What you'll learn
- What sets a style apart from direct formatting, with an easy analogy
- How to apply a style from the gallery and open the Styles pane
- How to modify a style (font, paragraph, based on, following paragraph) and create a new one
- What paragraph, character and linked styles are
Step by step
Understand the difference: style or direct formatting
If you select a heading and make it bold, 16 points and blue, that is direct formatting: a decision stuck to that piece of text. Word has no idea it's a heading; it only knows it has blue letters.
If you put the cursor in that heading and click Heading 1, you attach a label. The formatting lives in the label, not in the text: change the label and every paragraph wearing it changes. And Word now knows it's a heading, so it will use it for the table of contents and the Navigation Pane.
Rule of thumb: direct formatting for one-off exceptions; a style for anything that repeats.

Apply a style from the gallery
Put the cursor anywhere in the paragraph (no need to select it). Go to Home › Styles and click the style box, for example Heading 1. The whole paragraph changes at once.
The gallery only shows the recommended styles (Normal, No Spacing, Heading 1, Heading 2…). If the one you need isn't there, click the More arrow at the bottom-right corner of the gallery. Everything in this guide looks the same in Word 2016 and 2019.

Title is meant for the name of the whole document; chapters and sections use Heading 1, 2 and 3. Shortcuts: Ctrl+Alt+1, 2 and 3.
Open the Styles pane to see the full list
The gallery is just a shop window. To see every style, click the group's dialog box launcher: the tiny diagonal arrow in the bottom-right corner of Home › Styles (or press Ctrl+Alt+Shift+S). The Styles pane opens with the full list (check Show Preview to see each name in its own formatting).
At the bottom of the pane there are three buttons: New Style, Style Inspector and Manage Styles. Put the cursor in a paragraph and the pane highlights its style: that's how you find out “what is this” in somebody else's document.
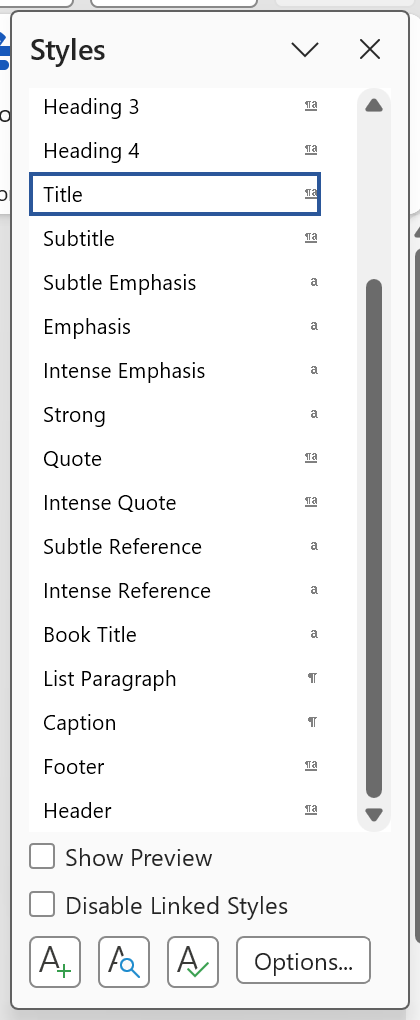
Modify a style: right-click › Modify
Right-click the style (in the gallery or in the pane) and choose Modify…. The Modify Style window has four fields at the top: Name; Style type; Style based on, the “parent” it inherits everything you don't override from; and Style for following paragraph, the one Word applies when you press Enter (covered in its own guide).
In the middle are the quick settings: font, size, color, alignment, line spacing. For the rest, click the Format button (bottom left): Font…, Paragraph… (spacing and “keep with next”, so a heading never sits alone at the bottom of a page), Numbering… and Shortcut key….
Choose Only in this document or New documents based on this template and click OK: every paragraph in that style changes at once.
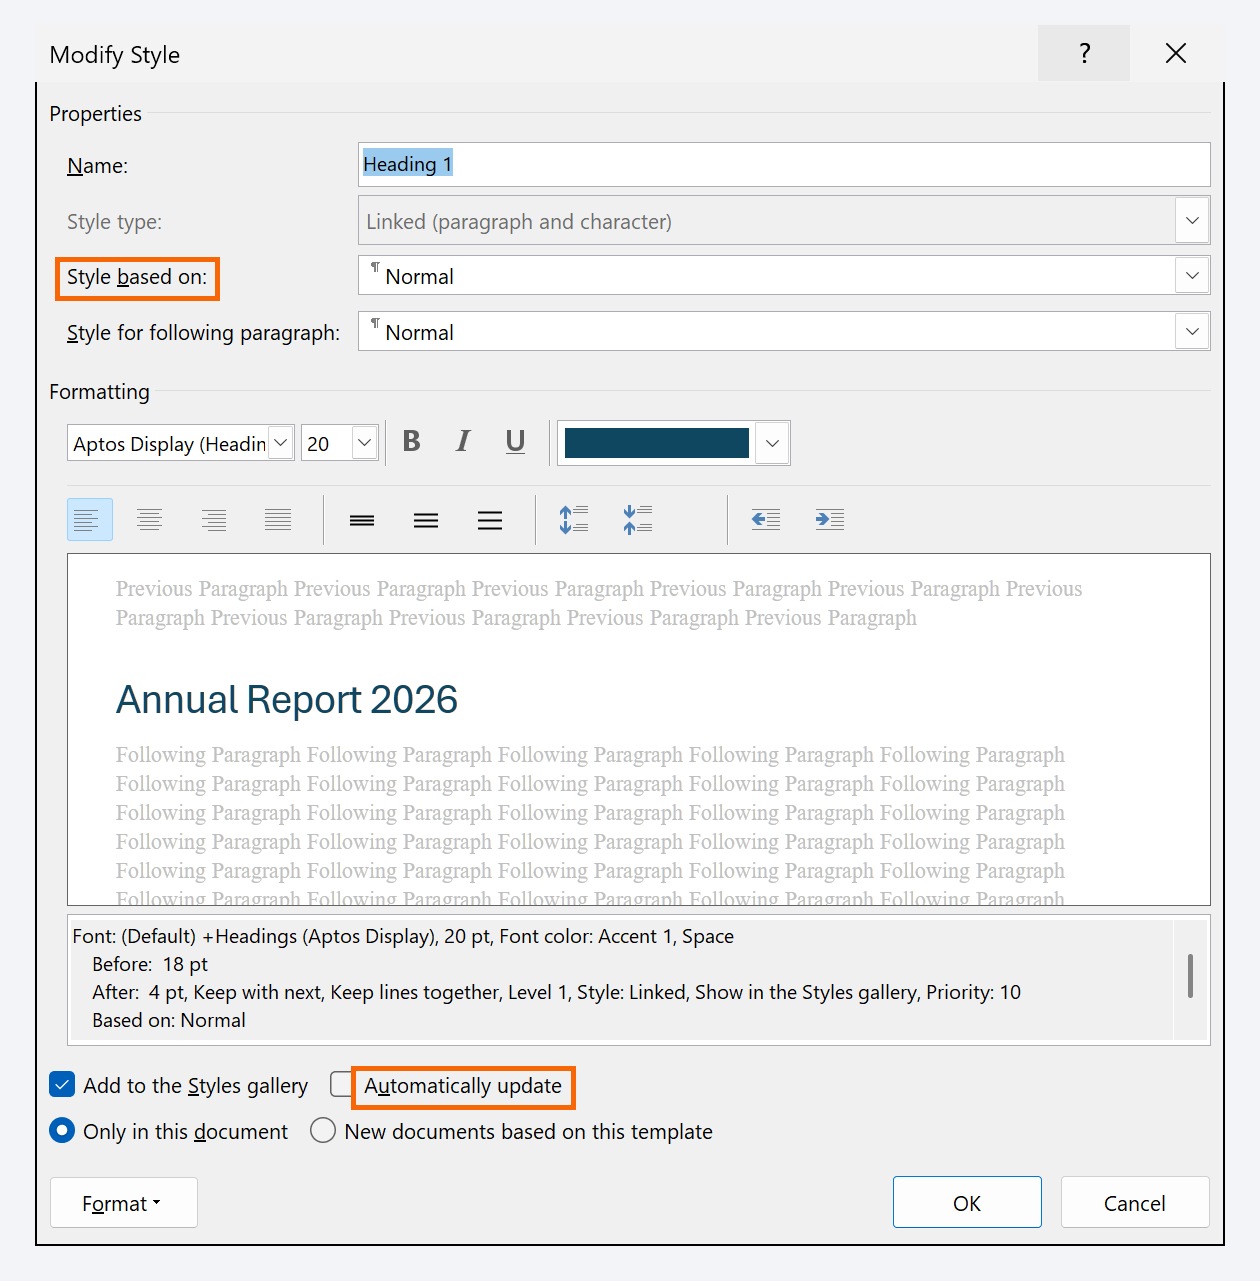
Leave “Automatically update” unchecked: with it on, any direct formatting you give one paragraph is copied into the style and changes the whole document without warning.
Use the shortcut: “Update Heading 1 to Match Selection”
There's a more intuitive way: format one paragraph by hand until it looks right. Then, with the cursor in it, right-click the style in the gallery and choose Update Heading 1 to Match Selection. Word copies that paragraph's formatting into the style and applies it to every other paragraph that uses it.
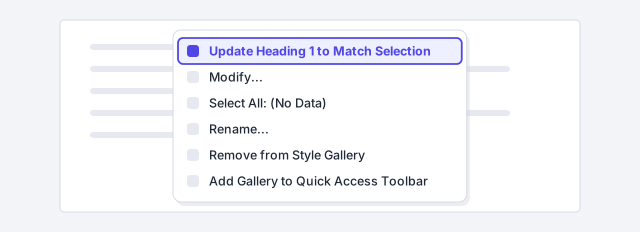
It works with any style, including your own. If you get it wrong, Ctrl+Z undoes the whole update.
Create a new style
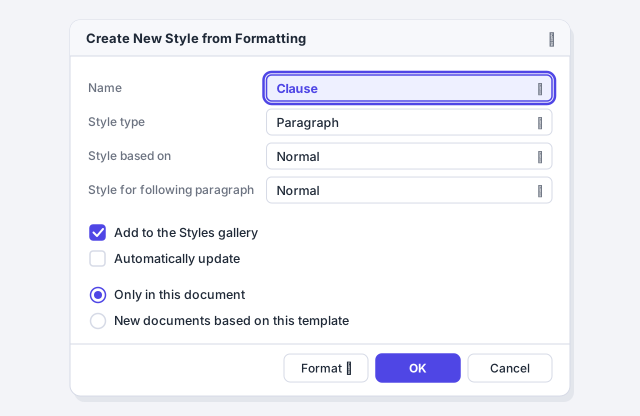
Two roads lead to the same window. One: in the Styles pane, click New Style (bottom left). The other: with the cursor in a paragraph you've already formatted the way you like, expand the gallery with the More arrow and choose Create a Style; Word takes that formatting and only asks for a name (click Modify… to tweak more).
In Create New Style from Formatting, type a clear Name (Clause, Block Quote), pick the Style type, the style it's based on (usually Normal) and the following paragraph. Keep Add to the Styles gallery checked and click OK.
Legal example: a paragraph style called Clause, based on Normal, bold, with “keep with next” on and Normal as the following paragraph. If the client wants a different font, you change it once.
Pick the right type: paragraph, character or linked
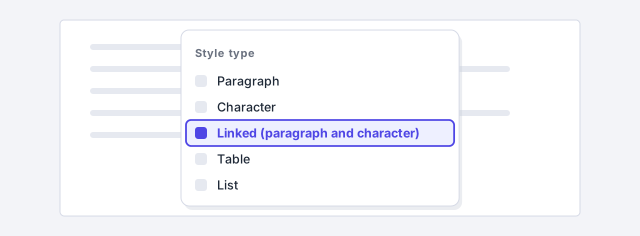
The Style type field has three options that matter (Table and List are a different world):
- Paragraph: affects the whole paragraph (alignment, indent, spacing). For headings, body text, quotes and clauses.
- Character: only the selected letters. For defined terms in a contract, product names or words in another language.
- Linked (paragraph and character): acts as one or the other depending on what you have selected. Word's headings are this type.
The linked-style trap: select half a sentence, apply Heading 1, and only that half grows while the paragraph does not count as a heading for the table of contents. Put the cursor in the paragraph without selecting anything, or check Disable Linked Styles at the bottom of the pane.
Cash in on what styles give you for free
With your headings in Heading 1 and Heading 2, the rest comes for free. On References › Table of Contents you pick a design and Word builds the automatic table of contents with correct page numbers. On View › Navigation Pane you see the chapter outline and reorder chapters by dragging.
If the draft came from an AI, paste it without formatting and apply the styles yourself: in a minute you have real headings. And to have them in every new document, or across your team, save them in a template (.dotx).

Expert tips
- Change Normal and almost everything follows. Most styles are based on Normal: change its font and the rest inherit it, except styles with their own font set (headings use the theme's heading font).
- Style Inspector for other people's documents. That button in the pane tells you which style the cursor's paragraph has and what direct formatting sits on top.
- Ctrl+Space clears direct character formatting from the selected text; Ctrl+Q does the same for paragraph formatting, and Ctrl+Shift+N applies Normal. Home › Font › Clear All Formatting resets everything in one click.
- Lawyers: a character style for defined terms. Create Defined Term (bold or small caps) and apply it to “the Seller” or “the Closing Date”. If the firm's convention changes, one edit to the style updates the whole contract.
Common mistakes and how to fix them
You apply Heading 1 and only half a sentence changes.
It's a linked style and you had text selected. Click in the paragraph without selecting anything and apply it again, or check “Disable Linked Styles” in the Styles pane.
You modify Heading 1 and some headings don't change.
They have direct formatting on top of the style, or never had Heading 1 applied (they're Normal in bold). Select them, click Clear All Formatting and apply the style.
The new style doesn't show in the gallery, or isn't there in new documents.
When creating or modifying it, check “Add to the Styles gallery” and, to have it in every new document, “New documents based on this template”.
In Word for Mac the gallery is on the Home tab as well, and the pane opens with Home › Styles Pane. To modify: right-click (or Control+click) the style › Modify Style… To create: New Style in the pane, or the Format menu › Style… › New. Heading shortcuts: ⌘+⌥+1, 2 and 3.
Frequently asked questions
What's the difference between a style and a theme?
A style defines the formatting of one kind of paragraph or text. A theme defines the color palette and the fonts for the whole document, and the built-in styles draw from it: that's why changing the theme on the Design tab changes your headings. More in theme colors and fonts.
Can I copy my styles to another document?
Yes. In the Styles pane click Manage Styles › Import/Export… to open the Organizer, where you copy styles from one document or template to another.
How many styles should a document have?
Few, with clear names: Normal, two or three heading levels, one for quotes or clauses, one for captions. If the pane lists dozens of styles like “Normal + 11 pt + Bold”, the document is full of direct formatting.
Official sources
Microsoft documentation consulted for this guide.
Saved only in this browser.