Automatic heading and clause numbering (1, 1.1, 1.1.1) without losing your mind
Put the cursor in a Heading 1 and go to Home › Paragraph › Multilevel List › Define New Multilevel List. Click More >> and, for each level, set Link level to style to Heading 1, Heading 2 and Heading 3. Type the number format for each level (1, 1.1, 1.1.1 or Article 1) and click OK. From then on, every paragraph with a heading style is numbered automatically and renumbers itself when you move chapters.
It happens in every contract, every thesis, every long report: you type “3.2” in front of the clause, tomorrow you insert a new one in the middle and now 3.3, 3.4 and 3.5 all need fixing… and the sentences that said “under clause 3.4” now point somewhere else. Or you use the numbering button and the list restarts whenever it feels like it, jumps back to “1” after you paste a paragraph and leaves new headings unnumbered.
The expert fix is not to number better: it's to stop numbering. In Word, the number can be a property of the style: a multilevel list linked to Heading 1, Heading 2 and Heading 3. Think of it as a counter that lives inside the style. Every paragraph that is a Heading 2 gets its “1.1”, “1.2”… without you typing anything, and if you move a chapter, every number below it is recalculated.
In this guide you set that list up your way (“1.1.1”, “Article 1”, “Clause 1.1”, “(a)”), insert cross-references that update themselves and learn to repair numbering that has broken. With a contract as the worked example, start to finish.
What you'll learn
- Why numbering typed by hand or with the Numbering button always ends up breaking
- How to link each level of a multilevel list to Heading 1, Heading 2 and Heading 3
- How to define formats such as 1.1.1, “Article 1”, “Clause 1.1” or “(a)” and when they restart
- How to cite a clause with a cross-reference that updates itself
- How to fix a list that jumps or continues where it shouldn't
Step by step
Apply heading styles to chapters and clauses, without typing numbers
It all starts with styles. Every chapter or article gets Heading 1; every section or clause, Heading 2; every sub-clause, Heading 3 (Ctrl+Alt+1, 2 and 3). Don't type the number in front of the text: Word will add it.
Why does numbering “by hand” or with the Numbering button fail? A typed number is just text: insert a clause in the middle and you fix every following one by hand, and the citations (“see clause 4.2”) go stale. The Numbering button attaches the number to the paragraph, not to the style: new headings come out unnumbered, “1.1” has no idea which chapter it belongs to and, when you paste text from another document, the count carries on where it shouldn't. A multilevel list linked to the styles fixes all three at once.
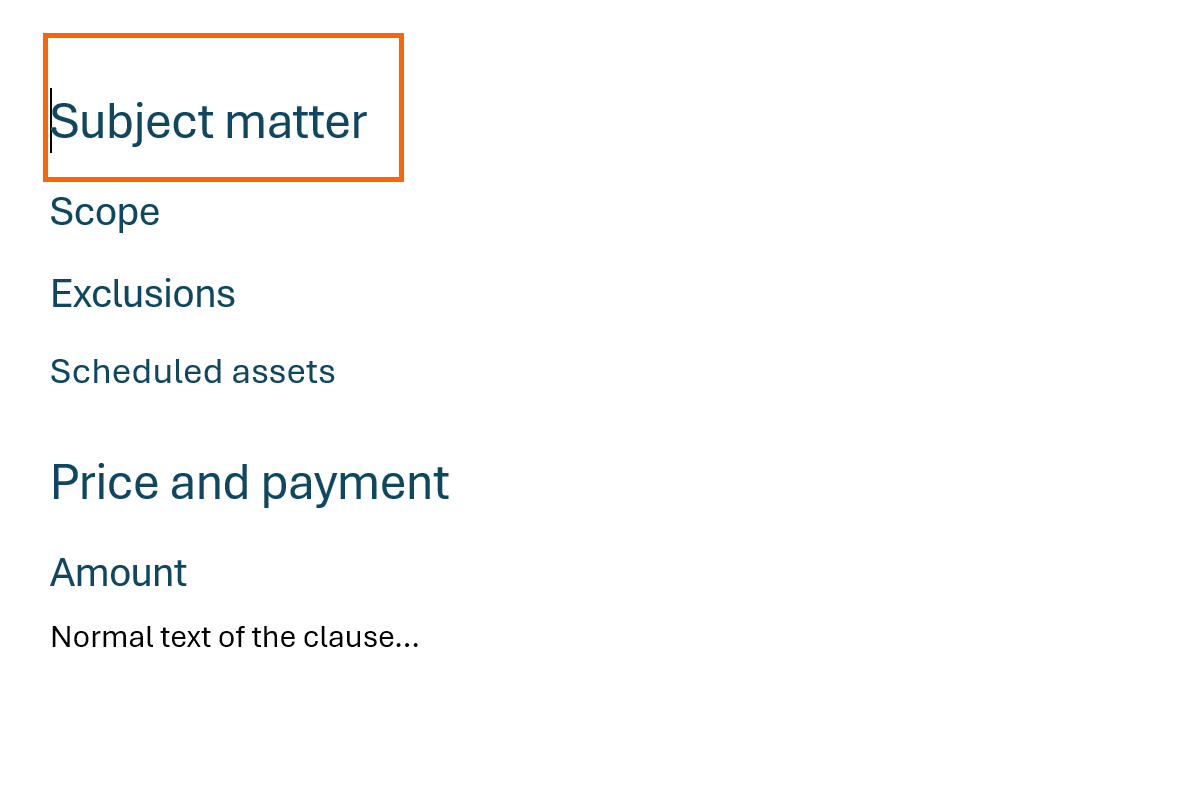
If you already have numbers typed by hand, delete them before going on. With many headings, Find and Replace with wildcards strips them in one go.
Open Home › Paragraph › Multilevel List
Put the cursor in the first Heading 1 of the document. On Home › Paragraph, click the Multilevel List button (third in the group, to the right of Numbering). The gallery drops down with Current List, List Library and, if any exist, Lists in Current Documents.
Shortcut for the impatient: the List Library includes models whose thumbnail reads “Heading 1”, “Heading 2”, “Heading 3” (for example “1 Heading 1 / 1.1 Heading 2 / 1.1.1 Heading 3” or “Article I / Section 1.01 / (a)”). They are already linked to the heading styles: one click and the whole document is numbered. Pick the “1 / 1.1 / 1.1.1” one and keep reading to make it exactly what you want.

Choose “Define New Multilevel List” and click “More >>”
Open the gallery again and, at the very bottom, choose Define New Multilevel List…. If the cursor is in a heading that is already numbered, the dialog opens with that list's settings, ready to tweak. First thing: click More >> in the lower-left corner. The dialog expands and the fields that really matter appear. (This dialog hasn't changed since Word 2007: in Word 2016 and 2019 it is identical.)

Link each level to its heading style
Under Click level to modify, select 1. On the right, open Link level to style and choose Heading 1. Now select level 2 and link it to Heading 2; level 3, to Heading 3. If you used the library model, just check they are already set this way.
That link is the whole trick: from now on “having the Heading 2 style” and “being level 2 of the list” are the same thing. Level to show in gallery only decides which level the thumbnail shows; leave it at Level 1.

Don't click OK until you finish the next two steps: the dialog saves all levels at once. And never link a level to Normal: you would number every body paragraph in the document.
Type the number format for each level
With level 1 selected, look at the Enter formatting for number box. Inside is a “1” on a gray background: that's the live number, the one Word will keep changing. Anything you type around it is fixed text. Type Article before the 1 (and a period after it, if you like) and you get “Article 1”, “Article 2”… Number style for this level switches between digits, letters and Roman numerals.
Select level 2. To get “1.1”, the box must contain the level 1 number, a period and the level's own number. If it doesn't: clear the box, open Include level number from and choose Level 1, type a period, then pick “1, 2, 3, …” again under Number style for this level so Word appends the level's own number. Repeat on level 3 for “1.1.1”. Internally Word stores that format as %1.%2 (level 1 number, period, level 2 number): you'll see that notation in macros and law-firm templates.
| You want | Number format box | Number style |
|---|---|---|
| 1, 2, 3 | [1] | 1, 2, 3, … |
| 1.1, 1.2 | [Level 1].[1] | 1, 2, 3, … |
| 1.1.1 | [Level 1].[Level 2].[1] | 1, 2, 3, … |
| Article 1 | Article [1] | 1, 2, 3, … |
| Clause 1.1 | Clause [Level 1].[1] | 1, 2, 3, … |
| (a), (b) | ([a]) | a, b, c, … |
In brackets, the gray number Word inserts; everything else is fixed text.

Decide when numbering restarts and where the number sits
Stay on level 2. Check that the Restart list after box is ticked and points to Level 1: that way, when Article 2 begins, the count goes back to 2.1 instead of carrying on at 1.5. Level 3 must restart after level 2. Word ticks this by default, but look anyway: it's the number one cause of “my 2.1 shows up as 1.5”. Start at lets you begin at another number, for instance when the document continues a schedule.
Under Position you decide the look: Aligned at is where the number starts; Text indent at, where the text starts; Follow number with picks a tab, a space or nothing. For headings and clauses, 0 in both and a space look clean; this indent overrides the heading style's own indent. Set for All Levels… copies the same position to every level. Click OK.

Level 1 in Roman numerals (I, II, III) but you want level 2 to read 1.1 rather than I.1? Tick Legal style numbering: it converts every inherited number to Arabic digits.
Check the result and move a chapter
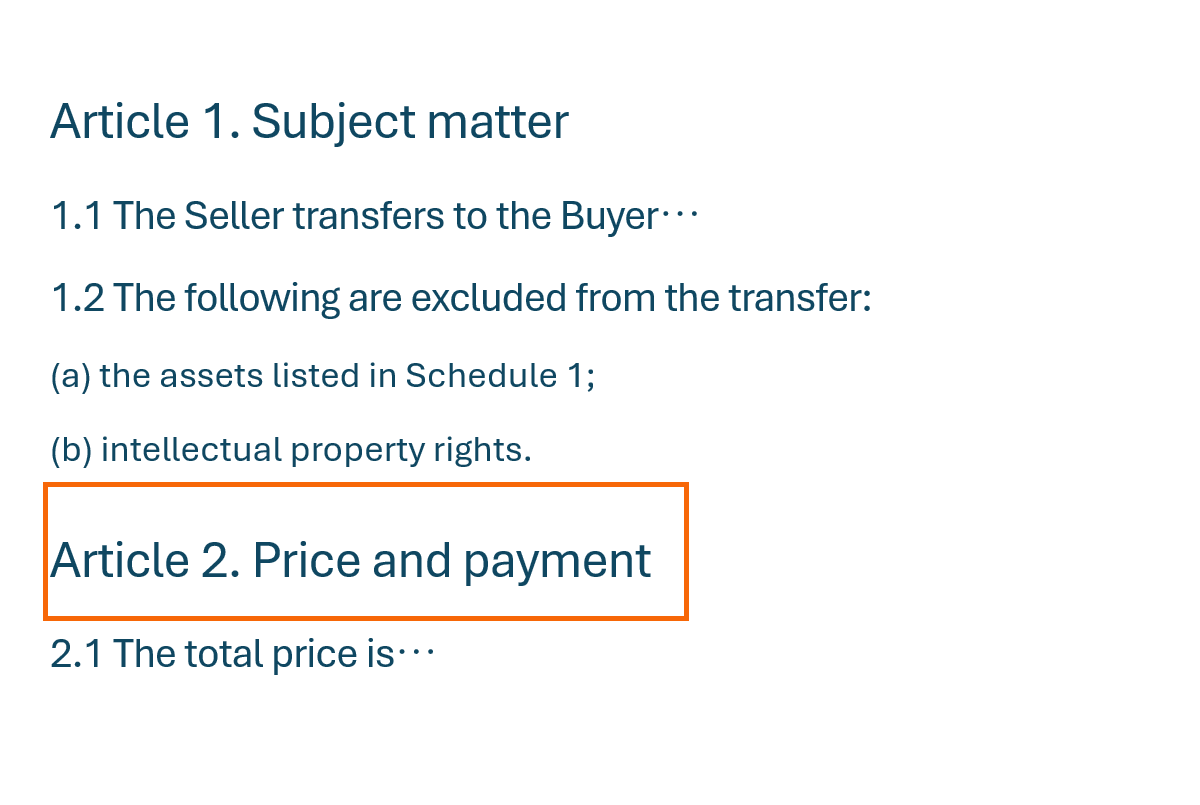
Every paragraph in Heading 1, Heading 2 and Heading 3 now shows a number, including the ones you'll write tomorrow: the number no longer belongs to you, it belongs to the style. Try dragging a whole chapter in the Navigation Pane (View › Show › Navigation Pane): Article 5 becomes Article 2 and all of its clauses renumber instantly. The automatic table of contents inherits the numbers without you doing anything.
To promote or demote a heading (and its number with it), apply the other heading style directly or press Alt+Shift+← or →. If a heading shows up without a number, it doesn't have the linked style: check it in the Styles gallery.
Insert cross-references to clauses that update themselves
Type the lead-in text (“in accordance with clause ”) and go to References › Captions › Cross-reference (it also lives under Insert › Links). Under Reference type choose Numbered item; under Insert reference to, Paragraph number (full context), which always writes the whole number (“1.2(a)”) even when you cite from another article. Leave Insert as hyperlink ticked so Ctrl+click jumps to the clause. Pick the clause in the list and click Insert.
What you inserted is a field, not text. If you reorder and clause 1.2 becomes 3.2, the citation updates when you print or when you press F9 with everything selected (Ctrl+A). To cite the heading's wording instead, choose Paragraph text.
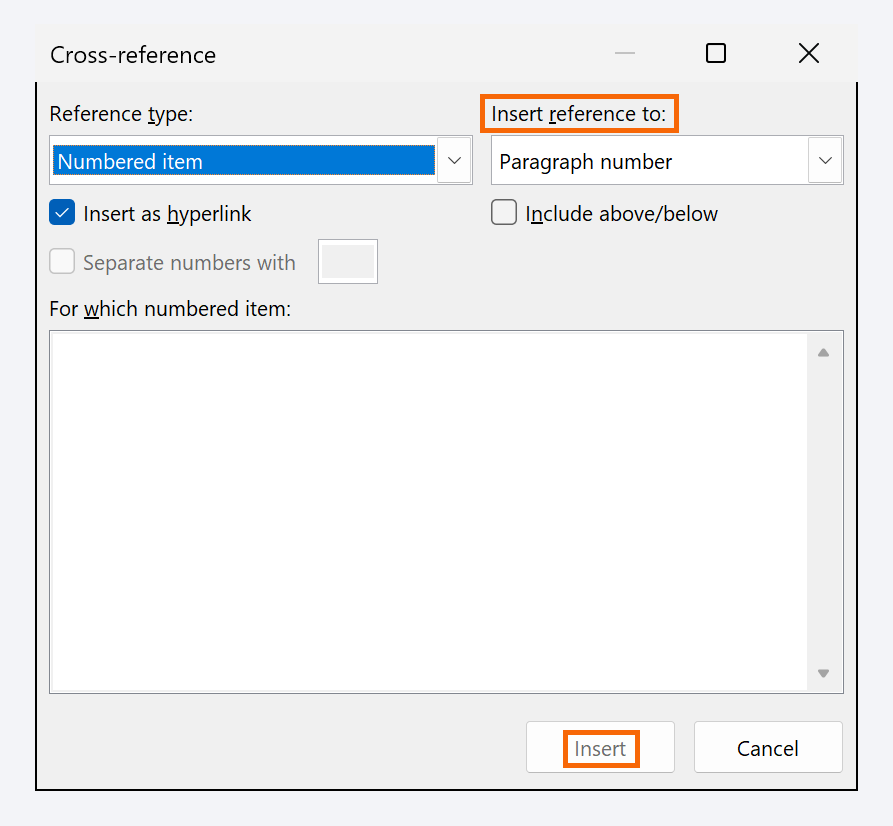
With plain “Paragraph number”, Word shortens the number depending on where you cite from: inside the same article it writes “(a)” instead of “1.2(a)”. In contracts, full context avoids arguments.
Fix broken numbering: Continue Numbering and Set Numbering Value
Sooner or later you'll paste a clause from another contract and the numbering will jump to “1” in the middle of Article 3, or carry on at “3.7” when a new article should begin. Right-click the number itself (not the text): Continue Numbering hooks that paragraph onto the previous list; Restart at 1 does the opposite; Set Numbering Value… opens a dialog to force a specific number (Set value to) or skip numbers on purpose (Advance value (skip numbers)).
If the pasted paragraph carries a different list of its own (common with text from AI or from a PDF), the clean fix is to reapply Heading 2 from the Styles gallery: the style brings its own numbering and the intruder list disappears.

Expert tips
- For firm-wide templates, use a list style. In the same gallery choose Define New List Style…, give it a name (Contract numbering) and under Format › Numbering… set up the levels exactly as above. Select New documents based on this template: the numbering travels with the template, appears by name in the gallery and anyone on the team can tweak it with right-click › Modify.
- Link levels to your own styles. In a contract, the text of clause 1.1 is usually a long paragraph, not a heading. Create a Clause style based on Normal, link it to level 2 instead of Heading 2, and the table of contents will list only the articles.
- Format the number without touching the heading. The Font… button in the dialog changes only the number (bold, color, size), not the heading text. That's how “Article 1” can be bold while the title stays regular.
- Did the draft come from AI? ChatGPT and friends deliver numbers as plain text (“1.1 Subject matter”). Ask for the text unnumbered or strip the numbers, apply the heading styles and let Word do the counting: how to turn AI Markdown into real headings.
- New clause right before a cited one. Word tracks cross-references with a hidden bookmark. To insert a clause immediately before one you already cite, put the cursor at the end of the preceding clause and press Enter, not at the start of the cited one: otherwise the reference may end up pointing at the new text.
Common mistakes and how to fix them
You number with the Numbering button and new headings come out unnumbered.
That button numbers loose paragraphs. Remove that numbering, define the multilevel list with Link level to style and apply the heading styles: the number comes with the style.
The second chapter starts at 1.5 instead of 2.1.
In Define New Multilevel List, select level 2 and tick Restart list after: Level 1 (and on level 3, after level 2).
Headings look indented or the number is glued to the text.
Position is controlled by the list, not the style. With the cursor in a numbered heading, go back to Multilevel List › Define New Multilevel List and adjust Aligned at, Text indent at and Follow number with.
Cross-references show the old number.
They are fields: they update when you print or press F9. Select all (Ctrl+A) and press F9. If you see something like {REF …}, press Alt+F9 to get the results back.
In Word for Mac the path is almost the same: Home › Paragraph › Multilevel List › Define New Multilevel List… (also from the Format menu › Bullets and Numbering…). The dialog has the same fields (link to style, number format, restart, position), just laid out differently. Cross-reference is under Insert › Cross-reference… and on the References tab.
Frequently asked questions
Can level 1 read “Article 1” and level 2 read “1.1” without getting “Article 1.1”?
Yes. “Article” is fixed text on level 1. When level 2 includes the level 1 number, it inherits only the digit, not the text. That's why the sample contract shows “Article 1” with “1.1”, “1.2” underneath.
Does it work the same for a thesis with chapters 1, 1.1, 1.1.1?
It's exactly the same mechanism. If you want “Chapter 1” on level 1, type that word before the gray number. The numbers also show up in the table of contents and in the Navigation Pane.
What's the difference between “Define New Multilevel List” and “Define New List Style”?
The first creates an unnamed list that lives in the document. The second creates a named style you can save in the template, see in the gallery and modify like any other style. For a one-off document the first is fine; for shared templates, use the second.
How do I change the format later?
Put the cursor in any numbered heading and go back to Home › Multilevel List › Define New Multilevel List: the dialog opens with the current settings. Change what you need and click OK; it applies to the whole list.
What about Word for the web?
The web version applies standard multilevel lists, but the Define New Multilevel List dialog only exists in the desktop app (Windows and Mac). Set it up on the desktop: the numbering is kept when you open the document on the web.
Official sources
Microsoft documentation consulted for this guide.
Saved only in this browser.