Create a corporate template (.dotx) so the whole team writes alike
Set up a document with your company's styles, theme colors, logo header and cover page, then save it with File › Save As › Save as type: Word Template (*.dotx). Word drops it in the Custom Office Templates folder and from then on it shows up under File › New › Personal. Double-clicking the template creates a new document and leaves the master untouched.
Every report your company sends out has a different font, a logo that drifts and headings in three colors. Someone “fixes” one and the next is chaos again. It's not carelessness: each person starts from a blank document (or the last one they could find) and rebuilds the formatting by hand.
A template is a mold; a document (.docx) is the piece that comes out of it. Save the mold once, with styles, colors, header and cover page already done, and every new document is born well-formed. In this guide you create a corporate template (.dotx), save it where Word looks for it, share it with your team and apply it to documents that already exist.
What you'll learn
- The difference between a .docx, a .dotx template and Normal.dotm
- How to set up styles, colors, logo, cover page and fields so everything changes from one place
- Where to save it so it shows up under File › New › Personal, and how to share it with your team
- How to attach it to an old document and update its styles
Step by step
Understand what a template is and how it differs from a document
A document (.docx) is the text you write and send. A template (.dotx) is a mold: it stores styles, colors, fonts, headers, cover page, margins and fixed text. When you double-click a template, Word doesn't open it: it creates a new document copied from it, and the mold stays intact.
The third file is Normal.dotm, the hidden template behind every blank document. It's yours alone, lives on your computer and doesn't share well. That's why a corporate template is built separately: a .dotx you can copy, send and update without touching anyone's Word.

If the template needs macros (say, a button that inserts the signature block), the format is .dotm, “macro-enabled”. For styles, logo and text, .dotx is enough.
Set up the styles with theme colors and theme fonts
Open a new document and define the palette first in Design › Colors and Design › Fonts (in the Document Formatting group); we cover it in theme colors and fonts. Then modify the styles everyone will use (Normal, Heading 1, Heading 2, List Bullet…) from Home › Styles › right-click › Modify.
The key: when you pick a heading color, use one of the Theme Colors (the top row of the color picker), not a standard or custom color. For the font, leave +Headings or +Body instead of a specific name. That way, if the company changes its blue or its typeface, you edit the theme once and every style follows the new palette.

If the draft comes from ChatGPT or Copilot, paste it into a document created from this template and apply Heading 1, Heading 2 and Normal: the corporate look appears on its own.
Add the logo header, the cover page and document property fields
Go to Insert › Header › Edit Header and insert the logo with Insert › Pictures › This Device. If you want a large logo on the cover only, tick Different First Page on the Header & Footer tab. For the cover, use Insert › Cover Page or design your own.
Don't type the details that change in every document (title, client, author) by hand: insert fields with Insert › Quick Parts › Document Property (Title, Author, Company…). Whoever uses the template fills the field once on the cover and the value repeats itself in the header and footer.

Put the logo in the header, not in the page body: in the body, someone will delete it or drag it while typing the first paragraph.
Save the file as a Word Template (.dotx)
Press F12 or go to File › Save As › Browse. Open the Save as type list and choose Word Template (*.dotx); if it contains macros, Word Macro-Enabled Template (*.dotm). As soon as you pick that type, Word jumps on its own to the Custom Office Templates folder inside Documents. Leave it there and give it a clear name, for example Client report 2026.
Check the title bar: it should now end in .dotx. That file is the mold.

Save repeated clauses as AutoText inside the template
With the .dotx still open, add the text that repeats in every document: confidentiality notice, signature block, governing-law clause. Select the text and go to Insert › Quick Parts › AutoText › Save Selection to AutoText Gallery.
In the Create New Building Block dialog, what matters is Save in: choose your template, not Normal.dotm. That way the AutoText travels inside the .dotx and any document created from it will have it. More in Quick Parts and AutoText.

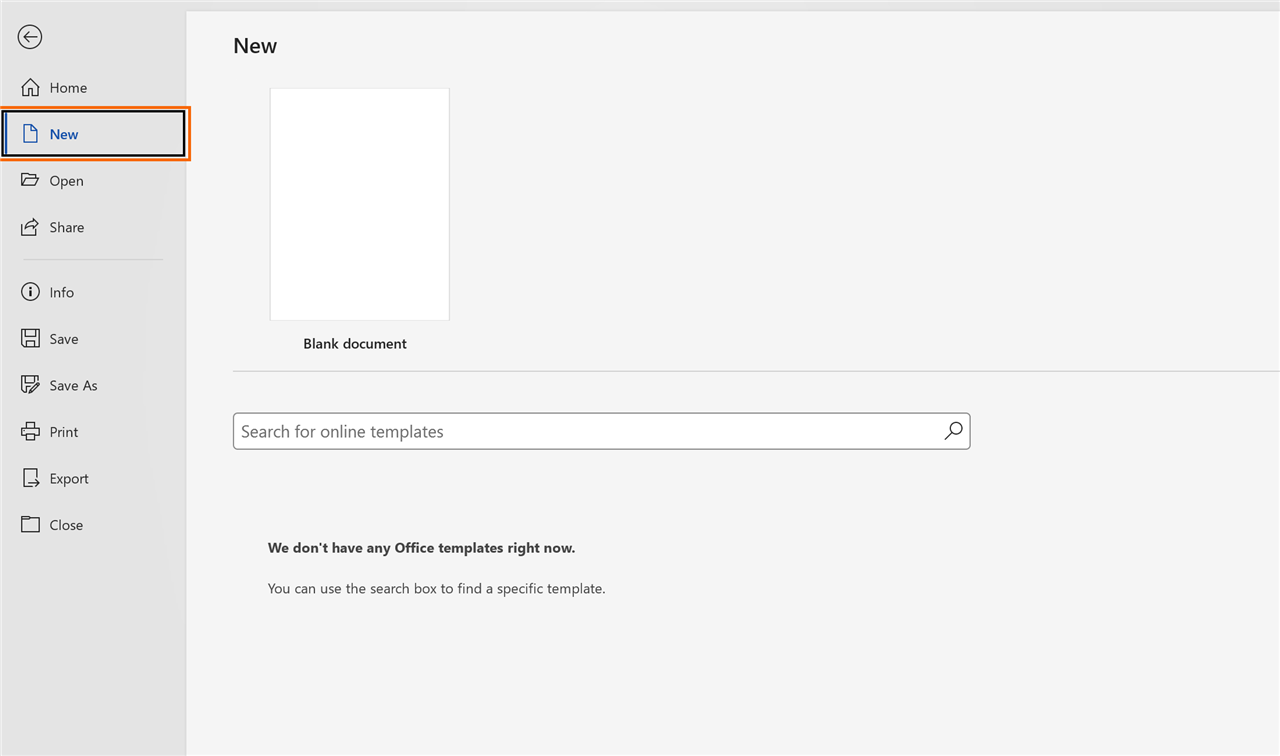
Create new documents from File › New › Personal
Close the template and go to File › New. Under the search box there are two tabs: Office and Personal (on some computers, Custom). Your template is under Personal: one click and Word creates Document1 with styles, logo and cover page, ready to fill in and save as .docx.
Mind the difference: double-clicking in File Explorer creates a new document (Document1 in the title bar). Right-click › Open (or File › Open from Word) opens the .dotx itself: do that only to change the mold.
Share the template with your team
Copy the .dotx to a folder the whole team can reach: a SharePoint library, a shared OneDrive folder or a network drive. Then each person tells Word where to look. The quick way: File › Options › Save › Default personal templates location, pointing at that folder. That box decides what shows up under Personal.
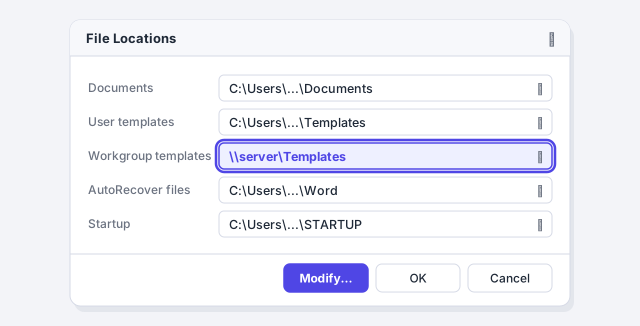
The “company” way is the workgroup templates location: File › Options › Advanced, scroll down to General and click File Locations…. Select Workgroup templates, click Modify… and pick the folder. Each person then sees the company templates under File › New (the tab usually becomes Custom) without losing their own.
If the folder lives in OneDrive or SharePoint, everyone needs it synced in File Explorer: Word expects a folder path, not a web address.
Attach the template to an existing document and update its styles
You have last year's contract and want it to look like the new template. Open it and go to Developer › Document Template (in the Templates group). If you don't see the Developer tab, turn it on in File › Options › Customize Ribbon by ticking Developer in the list on the right.
In Templates and Add-ins, click Attach…, choose your .dotx and tick Automatically update document styles. When you click OK, the document's styles are replaced by the template's. If you only want to copy two or three styles, use Organizer… and move them from one file to the other.

After updating, go back to the dialog and untick the box: if you leave it on, Word will copy the template's styles again every time you open the document and overwrite any local tweak.
Expert tips
- One template per document type. Report, letter, contract, minutes: each with its own cover and styles, but all sharing the same color and font theme. It's easier to maintain than one giant template.
- Check which template a document came from. Under File › Info › Properties › Advanced Properties, Summary tab, the Template field tells you whether it was born from your .dotx or from Normal.dotm.
- Lawyers: number the clauses in the template. Link the multilevel list to Heading 1 and Heading 2 once, and every contract comes out as “Clause 1, 1.1, 1.2” with nobody numbering by hand. We explain it in automatic clause numbering.
Common mistakes and how to fix them
You email the .dotx and the client says they “can't edit it” or sends back a file with a different name.
Always send a .docx: create the document from the template and save it. The .dotx is the team's internal mold, not the deliverable.
You change something in the template, but new documents still come out as before.
You probably edited a document created from the template (Document1) rather than the .dotx. Open it with right-click › Open, make the change and save. The title bar must show .dotx.
You attach the template to an old document and nothing changes.
Tick “Automatically update document styles” before clicking OK. Only the styles are updated: the header, cover page and logo aren't copied; paste those in by hand.
In Word for Mac the path is File › Save as Template; under File Format choose Microsoft Word template (.dotx), or .dotm if it has macros. Templates open from File › New from Template › Personal, and the folder is changed in Word › Preferences › File Locations › User templates. To attach a template use the Tools menu › Templates and Add-ins.
Frequently asked questions
Can I turn a document I already have into a template?
Yes. Open it, delete the content that changes in every version, keep what's fixed (header, cover page, styles, standard text) and save it with Save As › Word Template (*.dotx). Anything you don't delete will appear in every new document.
If I update the template, do existing documents update too?
No, not automatically. Each document keeps its own copy of the styles. To bring one up to date, attach the template to it and tick Automatically update document styles (step 8).
Does this work in Word for the web?
Creating the template, choosing the .dotx type and attaching it to a document are desktop Word tasks (Windows or Mac). Documents created from the template open and edit fine in Word for the web.
Official sources
Microsoft documentation consulted for this guide.
Saved only in this browser.