Section and page breaks: when to use each (and stop pressing Enter)
A page break (Ctrl+Enter or Insert › Pages › Page Break) just pushes text onto the next sheet. A section break (Layout › Page Setup › Breaks › Next Page, Continuous, Even Page or Odd Page) starts a new section with its own margins, orientation, columns, headers and page numbering. Turn on ¶ (Ctrl+Shift+8) to see breaks before you delete one.
It happens in every report: to start a chapter on a fresh page you press Enter ten times. Then you add a sentence higher up and the heading slides to the middle of a page. And when you finally manage to turn a table landscape, the whole document turns with it.
Word has two different tools for this. A page break is a plain “continue on the next sheet”. A section break is a border: each side can have its own margins, orientation, columns, headers and page numbering, like separate documents printed together. Think of a contract: the body in portrait, the annex with the wide table in landscape, and each annex numbered from 1. Here you learn to see breaks, pick the right one and delete them without the document falling apart.
What you'll learn
- When to use a page break and when to use a section break
- What a section controls: margins, orientation, columns, headers and page numbers
- How to see breaks with ¶ and delete them without losing the layout
- How to set a landscape table, a two-column passage or a separately numbered annex
Step by step
Turn on the ¶ marks so you can see the breaks
Breaks are invisible until you ask Word to show them. Go to Home › Paragraph and click the ¶ button (Show/Hide ¶), or press Ctrl+Shift+8. A page break shows as a dotted line labeled Page Break; a section break as a double line labeled Section Break (Next Page), (Continuous), (Even Page) or (Odd Page).
Leave it on while you work with breaks: it's the only way to know what you're deleting. The rest of the symbols are explained in formatting marks: see the invisible.

In View › Views › Draft, breaks are always shown with their label, even with the marks turned off.
Move to a new page with Ctrl+Enter, never with Enter
To start a chapter on a new page, put the cursor in front of the heading and press Ctrl+Enter (or Insert › Pages › Page Break). Word leaves the rest of the sheet blank and carries on on the next one. Margins, headers and page numbers continue as before.
If instead you press Enter until you reach the next page, every empty paragraph is a line of text. As soon as you add or remove a sentence higher up, everything shifts: the heading drops to mid-page, or a single line is stranded at the top or bottom (the “widows” and “orphans” printers talk about).

If every Heading 1 must start on a new page, don't insert anything: modify the Heading 1 style › Format › Paragraph › Line and Page Breaks › Page break before.
Understand what a section controls (and when you need one)
A section is a stretch of the document with its own page setup. Inside a section, and only there, you can change:
- Margins, orientation and paper size.
- Columns: a two-column passage in the middle of normal text.
- Headers and footers: the chapter name at the top, a different footer in the annexes.
- Page numbering: Roman numerals in the front matter, Arabic from chapter 1, each annex from 1.
- Endnotes per section, page borders and line numbers.
A new document has a single section. If all you need is a fresh sheet, a page break is enough. If anything on that list has to be different in one stretch, you need a section break. That's the whole rule.

Insert the right section break from Layout › Breaks
Put the cursor exactly where the new section should start and go to Layout › Page Setup › Breaks (in Word 2016/2019 the tab is called Page Layout). Under the Section Breaks heading, pick one:
- Next Page: the new section starts on a new sheet. This is the usual one: chapters, annexes, a landscape page.
- Continuous: the new section starts on the same page. For changing columns or margins mid-page.
- Even Page / Odd Page: like Next Page, but Word skips a page if needed to start on an even or odd page. That's how double-sided books open every chapter on the right-hand, odd page.
There is no built-in keyboard shortcut for a section break.
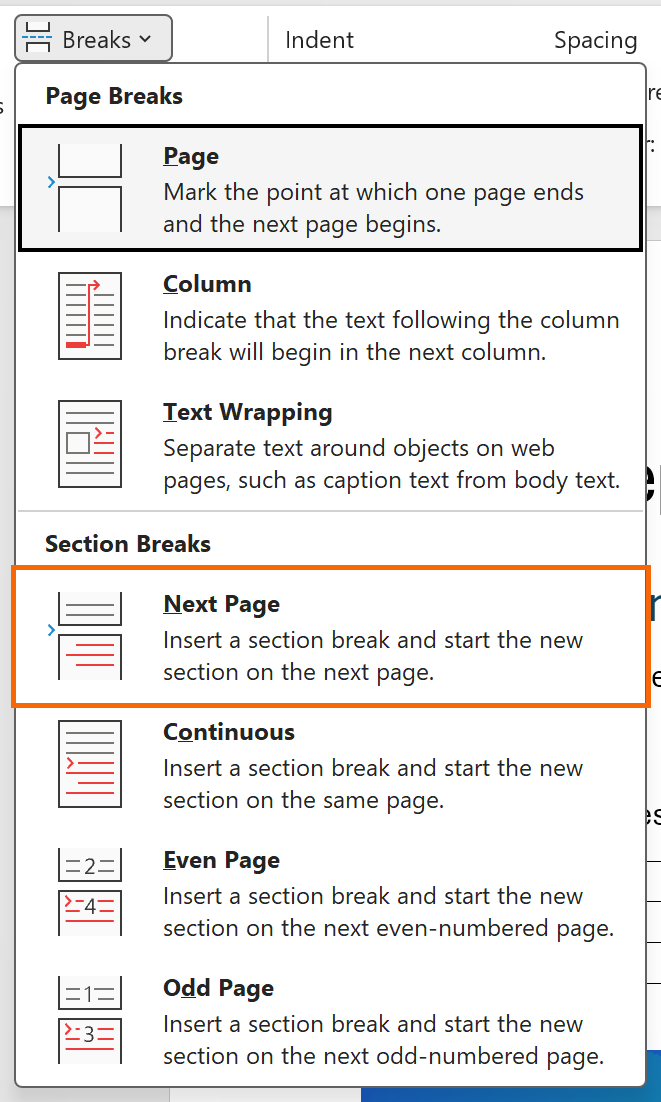
The three items at the top of the menu (Page, Column, Text Wrapping) are page breaks, not section breaks. Check the heading before you click.
Change the layout of the new section only: a wide table in landscape
Classic example: a twelve-column table that won't fit in portrait. Insert a Next Page break before the table and another after it. With the cursor inside the middle section, go to Layout › Page Setup › Orientation › Landscape. Only that section turns.
The same goes for Margins, Size and Columns: each button acts on the section the cursor is in. To be sure, open the full dialog with the launcher icon in the corner of the Page Setup group: at the bottom there's an Apply to dropdown (This section, This point forward, Whole document).

Right-click the status bar and tick Section: Word will always tell you which section the cursor is in.
Give each chapter or annex its own header and page numbers
Each section can have different headers and footers, but Word links them by default. Double-click the header of the new section: the Header & Footer tab opens. In the Navigation group, turn off Link to Previous. From then on, whatever you type there no longer copies back into the previous section. Repeat in the footer: they are unlinked separately.
Typical legal case: a contract with three annexes, each numbered from 1. Before each annex, a Next Page break; in its footer, unlink, then Insert › Page Number › Format Page Numbers and set Start at 1. More detail in different headers per chapter and page numbers.

If you change a header without turning off Link to Previous, the change propagates backwards into every linked section.
Set a passage in two columns with a Continuous break
To run one stretch (a list of signatories, a glossary) in two columns without touching the rest, select that text and go to Layout › Page Setup › Columns › Two. Word inserts two Continuous section breaks for you, one before and one after, and applies the columns only to the middle section.
It's the same mechanism, done automatically. Whenever you wonder “who put this section break here?”, the answer is almost always columns, or an orientation change applied to selected text.

Delete a section break without losing the layout
With ¶ on, click right in front of the Section Break line and press Delete. First, understand what will happen: the break stores the page setup of the section that ends there. When you delete it, that section disappears and its text joins the next one, with the next section's layout.
In practice: delete the break between a portrait chapter and a landscape annex, and the chapter turns landscape. So the rule is: before deleting, make the following section look the way you want to keep. And if it goes wrong, Ctrl+Z.
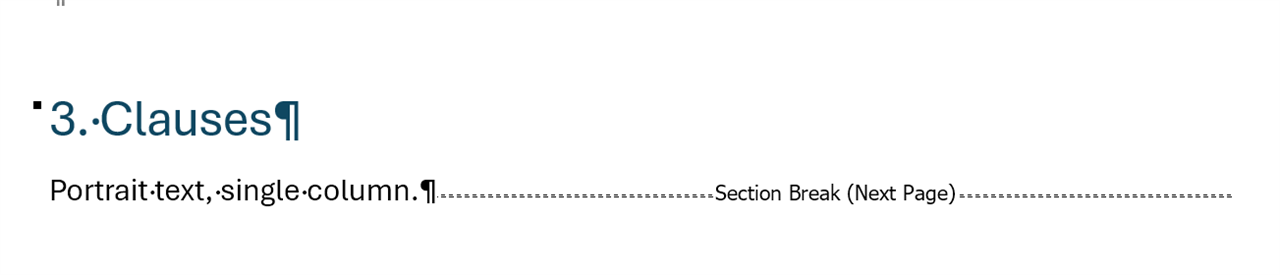
The section before inherits the layout of the section after, not the other way round. This is the mistake that wrecks the most documents.
Expert tips
- Find and delete breaks in bulk. In Find and Replace (Ctrl+H),
^mfinds manual page breaks and^bfinds section breaks. Ideal for cleaning up text pasted from AI or from someone else. More codes in advanced Find and Replace. - Change a break's type without deleting it. Cursor in the section that starts after the break › launcher icon in Page Setup › Layout tab › Section start.
- Endnotes per chapter. In References › Footnotes (launcher icon) you can place endnotes at the end of each section and restart their numbering in each one.
- Let AI write the text; you place the breaks. The “---” lines or empty paragraphs ChatGPT uses to separate parts are not breaks. Paste, apply styles, then insert breaks wherever the layout changes.
Common mistakes and how to fix them
You change the orientation for a table and the whole document turns.
There was no section break on either side of the table, or the cursor was in another section. Undo with Ctrl+Z, insert a Next Page break before and after, put the cursor between them and try again.
You delete a section break and the previous chapter loses its margins or headers.
That's expected: the previous section inherits the layout of the next one. Undo with Ctrl+Z, fix the following section first, then delete again.
You edit the header in chapter 3 and it changes in chapters 1 and 2 too.
Link to Previous was still on. Go into the chapter 3 header, turn it off in Header & Footer › Navigation, and type the header again.
In Word for Mac the options are under Layout › Breaks, with the same four section breaks, and also in the Insert menu › Break. A page break is ⌘+Return and the ¶ marks toggle with ⌘+8. Link to Previous is likewise on the Header & Footer tab.
Frequently asked questions
What's the difference between a page break and a section break?
A page break only moves text to the next sheet. A section break also opens a new zone with its own page setup: margins, orientation, columns, headers, numbering. If you don't need to change any of that, use a page break.
Why are there section breaks in my document if I never added any?
Word creates them when you apply columns to selected text or change orientation or margins with “Apply to: This point forward”. They also arrive in templates and in text copied from other documents. Turn on ¶ to locate them.
Can I change a Next Page break into a Continuous one without deleting it?
Yes. Put the cursor in the section that starts after the break, open the Page Setup dialog (launcher icon in the group), go to the Layout tab and change Section start.
Is there a keyboard shortcut for a section break?
Not out of the box; only the page break has Ctrl+Enter. You can get there by keyboard by pressing Alt and following the letters that appear over the ribbon until you reach Breaks.
Official sources
Microsoft documentation consulted for this guide.
Saved only in this browser.