Create a multiple-choice test in Word (with checkboxes and an answer key)
Number the questions with Home › Paragraph › Multilevel List (the 1) a) i) style) and press Tab at the start of each option so it becomes a), b), c) or d). Turn on Keep with next so a question never splits from its options, add checkboxes with Developer › Controls › Check Box Content Control, and protect the digital version with Review › Protect › Restrict Editing › Filling in forms.
It happens every semester: you copy last year's test, delete one question and the whole numbering falls apart. You typed the options by hand (“a)”, “b)”…), question 14 ends up alone at the bottom of the page while its options jump to the next one, and making version B costs you an afternoon of renumbering.
The fix is to treat the test as what it really is: a list with two levels. Level one is the questions (1, 2, 3…) and level two is the options (a, b, c, d). Word supplies the numbers and letters; you just type. Think of a paper form with the blanks already printed: you fill them in and the order takes care of itself.
In this guide you build a test that works on paper and on screen, with an answer key and a second version with the questions shuffled. It works the same for teachers, HR teams and trainers.
What you'll learn
- Number questions and a) b) c) d) options that reorder themselves
- Keep each question from splitting from its options across pages
- Add clickable checkboxes for on-screen tests or ☐ symbols for paper
- Store the answers as hidden text and create version B in minutes
Step by step
Number the questions with the “1) a) i)” multilevel list
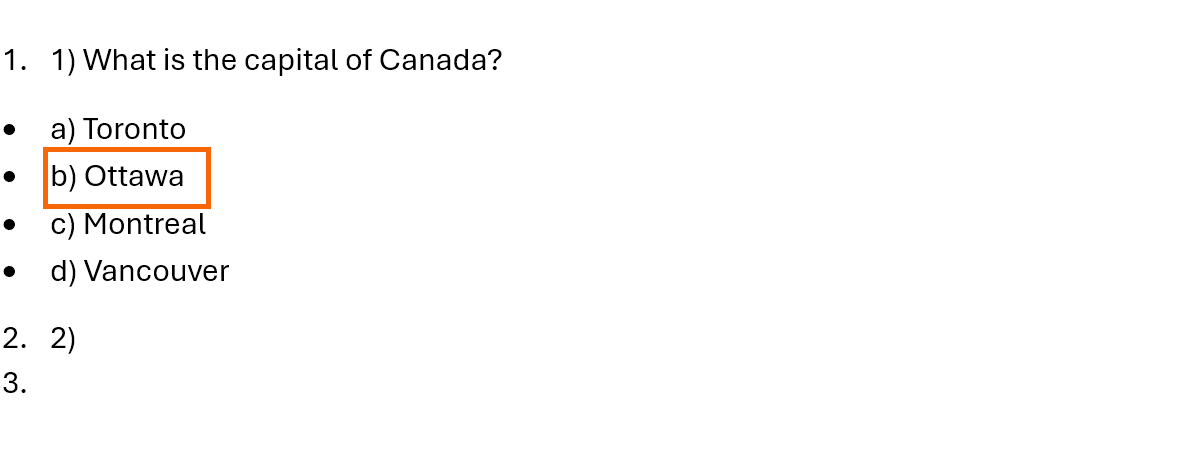
Put the cursor where the first question goes. Go to Home › Paragraph › Multilevel List and, in the List Library, pick the 1) a) i) style. It already has what you need: numbers for level one and letters with a parenthesis for level two.
Type the first question and press Enter: Word creates number 2) for you. If your test has titled parts (“Part I. Grammar”), number those headings with styles, as we explain in automatic heading numbering.

If the 1) a) i) style isn't in your library, use Numbering and later change the level-two format under Multilevel List › Define New Multilevel List.
Type the options as level two with Tab
After typing the question, press Enter and, with the cursor at the start of the new line, press Tab: number 2) turns into a) and the line indents. Type the option, press Enter, and you get b). Keep going to d).
After the last option, press Enter and then Shift+Tab: you're back on level one and the next question appears with its number. The Increase Indent and Decrease Indent buttons do the same with the mouse.
Got the questions from an AI tool? Paste them as plain text, delete the hand-typed numbers and letters and apply the list: you get real numbering.
Keep each question on the same page as its options
Select the question and its options except the last one (from “1)” to “c)”). Open the Paragraph dialog with the small arrow in the corner of Home › Paragraph, go to Line and Page Breaks and check Keep with next. Each paragraph now sticks to the next one, so if d) doesn't fit, the whole block moves together.
Do this at the end, once the test is finished. For the next question, select it the same way and press F4: Word repeats your last formatting action. More in widows, orphans and Keep with next.

Don't apply it to the whole document at once: if every paragraph is kept with the next, Word has nowhere to break and the rule stops working.
Add checkboxes: controls for screen, ☐ for paper
On-screen test. Put the cursor right after the letter “a)” and go to Developer › Controls › Check Box Content Control. A box appears that checks and unchecks with one click. Copy it (Ctrl+C) and paste it in front of every option. If you don't see the Developer tab, turn it on as shown in fillable forms.
Paper test. You don't need controls: the ☐ symbol is enough. Go to Insert › Symbols › Symbol › More Symbols…, choose the Segoe UI Symbol font, type 2610 in Character code and insert it. Shortcut: type 2610 and press Alt+X.

For the student's details (name, class, date), add a Plain Text Content Control after each label.
Protect the version students fill in on screen
Go to Review › Protect › Restrict Editing. In the pane, under Editing restrictions, check Allow only this type of editing in the document, choose Filling in forms and click Yes, Start Enforcing Protection. The password is optional.
From then on, people can only check the boxes and type in the blanks: nobody can change a question or delete an option. Students save the file and send it back to you.

Protection prevents accidental changes, but it isn't strong security: never use it to hide the answers inside the same file.
Store the answer key as hidden text
Work on a master copy. At the end of each correct option, type a marker such as “✔ correct”. Select it, open the Font dialog with the small arrow in Home › Font and check Hidden under Effects. The marker vanishes from the screen and from printouts; with formatting marks on (Ctrl+Shift+8) you see it again, with a dotted underline.
To print your grading copy, turn on File › Options › Display › Print hidden text, print, and turn it off again.

Hidden text is still inside the file. Before sending a .docx to students, save a copy and remove it with File › Info › Inspect Document › Hidden Text › Remove All.
Create version B by reordering questions and options
Save the master copy under another name (F12, for example “Test-B”). Select a whole question block and press Alt+Shift+↑ or ↓: the block moves up or down and every question renumbers itself. Do the same with the options of a few questions so the correct answer lands on a different letter.
Because the hidden “✔ correct” marker travels with its option, version B's answer key updates itself. Type “Version B” in the header so the stacks never get mixed up.

An AI tool can suggest a random order, but move the blocks yourself in Word: that way you keep the numbering and the hidden markers.
Print or save each version as a PDF
Check the preview in File › Print: no question should be split and no hidden text should show. To email a paper version, save it as a PDF from File › Save As, type PDF (*.pdf), or with File › Export › Create PDF/XPS Document.
Keep in mind that in the PDF the checkboxes are just pictures: nobody can click them. Share the on-screen version as a protected .docx. More options in save a professional PDF.

Expert tips
- Save the test as a template. With the header, the student-details table and the list already set up, save it as a Word Template (*.dotx): every new test starts ready to type.
- Add room with “Spacing Before”. Don't press Enter twice between questions: in the Paragraph dialog, set 12 pt of Before spacing for level one. Empty paragraphs break both the list and the pagination.
- For automatic grading, use Microsoft Forms. If the test is online, Microsoft Forms lets you build quizzes and score multiple-choice questions. Word is better when you need paper, careful layout or a file to archive.
Common mistakes and how to fix them
When you delete or move a question, the options restart at a) or carry on to e).
Hand-typed letters never restart. Apply the multilevel list and use Tab and Shift+Tab to change levels. If a question gets the wrong number, right-click the number › Continue Numbering.
Clicking a checkbox selects the square instead of checking it.
You inserted the ☐ symbol, which is just text. To check with one click you need the Check Box Content Control from the Developer tab.
A student saw the answers in the file you sent.
Hidden text shows up with Ctrl+Shift+8. Always send a copy without hidden text (Inspect Document › Hidden Text › Remove All) or a PDF.
Students can't check anything in the protected document.
Make sure you chose Filling in forms (not No changes (Read only)) and that the boxes are content controls, not symbols.
In Word for Mac, turn on the Developer tab in Word › Preferences › Ribbon & Toolbar; whether the check box content control is available depends on your version. Form protection is on the Review tab. To move a paragraph, use ⌃+⇧+↑ or ↓; hidden text is under Format › Font › Hidden.
Frequently asked questions
Can Word grade the test for me?
Not on its own. Word lays out the test and collects answers, but it doesn't score them. For automatic grading use Microsoft Forms or your school's platform; for paper, use the answer key stored as hidden text.
How do I change the checked symbol to an X?
Select the control and open Developer › Properties. In the check box properties you can change the checked and unchecked symbols by picking another character.
Do the checkboxes work in Word for the web?
It depends on your version and the type of control. For on-screen tests, ask students to open the file in the Word desktop app and always do a trial run before test day.
Saved only in this browser.