Print in Excel without cutting anything off: print area, fit to one page and repeat headers
Select the range and go to Page Layout › Print Area › Set Print Area. Change Orientation to Landscape and, in the Scale to Fit group, set Width to 1 page and Height to Automatic. To repeat the headers, open Print Titles and type $1:$1 in “Rows to repeat at top”. Check the result in File › Print before printing.
It happens every time: you print a report and the last column ends up alone on a second page, or page 3 is a wall of numbers with no headers and nobody knows what each column means. Excel doesn't think in paper: it thinks in an endless grid and cuts it wherever the margins fall.
The fix is to tell it three things: what to print (the print area), how to fit it (orientation and scaling) and what to repeat on every page (the header row). It's like setting up a photocopy: you pick the part, adjust the zoom and put the heading on every sheet. You set it once and it's saved with the file.
What you'll learn
- How to decide exactly which range gets printed with the print area
- How to fit every column across one page without making the text tiny
- How to repeat the header row on every page
- How to move page breaks by hand in Page Break Preview
- How to check everything before wasting paper
Step by step
Start by checking File › Print
Before changing anything, go to File › Print (or press Ctrl+P). On the right you'll see the preview and, below it, the page counter (for example, 1 of 6). Page through with the arrows: you'll see whether the problem is extra columns, missing headers or something printing that you didn't want.

If the counter shows far more pages than you expected, there are usually extra columns or cells with content far away from your data.
Set the print area
Select only what you want on paper. In the example, a sales-by-customer report fills A1:O250 (customer, region, twelve months and the total), and column P holds internal notes that shouldn't print. Select A1:O250 and go to Page Layout › Page Setup › Print Area › Set Print Area.
Excel draws a thin line around the range. From now on it prints only that, even if there's more on the sheet.
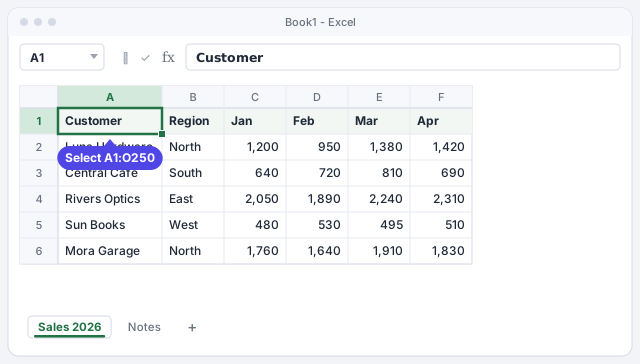
To select a long range quickly, click A1 and press Ctrl+Shift+End, or type A1:O250 in the Name Box and press Enter.
Switch the orientation to landscape
A report with many columns fits better sideways. Go to Page Layout › Page Setup › Orientation and choose Landscape. If the list is narrow and very long (few columns, many rows), keep it in Portrait.

Fit all columns to one page wide
In Page Layout › Scale to Fit set Width: 1 page and leave Height: Automatic. Excel shrinks the scale just enough for every column to fit across, and lets the rows flow onto as many pages as needed.
Watch the Scale box: if it drops below 60–70%, the text gets hard to read. In that case, remove columns from the print area or reduce the margins with Margins › Narrow.

Don't also set Height to 1 page on a long list: Excel will squeeze all 250 rows onto one sheet and the text will be unreadable.
Repeat the header row on every page
Go to Page Layout › Page Setup › Print Titles. The Page Setup box opens on the Sheet tab. Click in Rows to repeat at top, then click the row 1 heading on the sheet: $1:$1 appears. Click OK.
If your headers take two rows, select both ($1:$2). And if the report is so wide that it spans several pages across, also use Columns to repeat at left with the customer column ($A:$A).

If the repeat boxes are grayed out, you opened Page Setup from File › Print. Close it and use the Print Titles button on the ribbon instead.
Move page breaks by hand if needed
Go to View › Workbook Views › Page Break Preview. You'll see each page numbered and some blue lines: dashed lines are breaks Excel added; solid lines are the ones you set. Drag a line to decide where each page ends, for example so a customer or a month isn't split across two sheets.
To add a break, select the row where the new page should start and go to Page Layout › Breaks › Insert Page Break. Go back to View › Normal when you're done.

If you drag a break to fit more columns on a page, Excel lowers the scale automatically. Check the Scale box afterwards.
Center the table and number the pages
Open the full box with the small arrow button in the bottom-right corner of the Page Setup group. On the Margins tab, tick Center on page › Horizontally. On Header/Footer, open the Footer list and choose Page 1 of ?: every sheet will say “Page 2 of 6”, so nobody mixes up the order.

Check the preview and print (or save as PDF)
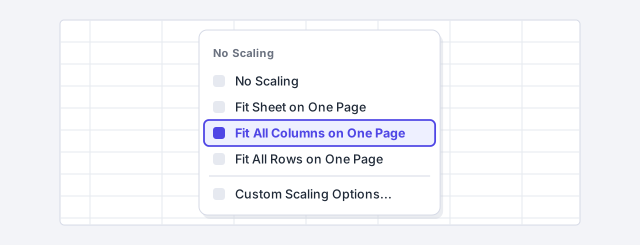
Go back to File › Print and page through everything: the headers should appear at the top of every page and no column should be left on its own. If you need a quick fix without returning to the ribbon, the last list under Settings offers Fit All Columns on One Page, which is the same as Width: 1 page.
Everything you set up also applies to PDFs: File › Save As and choose the PDF file type.
Expert tips
- Print a selection without changing anything. To print a few rows just once, select them and in File › Print change the first list to Print Selection. The saved print area stays as it is.
- Several areas, several pages. Select separate ranges while holding Ctrl and click Set Print Area: each range prints on its own page.
- Gridlines on paper. They don't print by default. Turn them on in Page Layout › Sheet Options › Gridlines › Print, or better, turn the data into a table with borders: Excel tables.
- Print Titles is not Freeze Panes. Freeze Panes pins the headers on screen; Print Titles repeats them on paper. You usually want both: how to freeze the header row.
Common mistakes and how to fix them
Blank or nearly empty pages print at the end.
There are cells with content or formatting far away from your data. Press Ctrl+End to jump to the last used cell, delete what's not needed, or set a print area that leaves it out.
You added new rows and they don't print.
The print area is fixed. Select the full range again and click Set Print Area, or use Print Area › Clear Print Area to print everything that's used.
The text comes out tiny.
You set both Width and Height to 1 page on a long list. Leave Height on Automatic and, if the scale is still very low, remove columns from the print area or use narrow margins.
Headers repeat on one sheet but not on another.
Page setup belongs to each sheet. Repeat Print Titles on every tab you're going to print.
In Excel for Mac you'll find the same options on the Page Layout tab: Print Area, Orientation, Print Titles and the Width and Height boxes. To print, use File › Print or ⌘+P.
Frequently asked questions
Is the print area saved with the file?
Yes. It's saved in the workbook, and each sheet has its own. Orientation, scaling and repeated rows are saved too.
How do I remove a print area someone else set?
Go to Page Layout › Print Area › Clear Print Area. Excel goes back to printing the whole used range of the sheet.
Why doesn't Print Titles do anything on the first page?
It does, you just can't tell: row 1 is already at the top of page 1. You'll see the effect from page 2 onwards.
Does this also work when saving as PDF?
Yes. The PDF uses the same page setup as the printer: print area, orientation, scaling, repeated headers and footer.
Saved only in this browser.