Advanced mail merge: If…Then…Else rules, formatted dates and amounts
Press Alt+F9 to show field codes and add switches: { MERGEFIELD Date \@ "MMMM d, yyyy" } for dates and { MERGEFIELD Amount \# "$#,##0.00" } for amounts. Rules live in Mailings › Rules (If…Then…Else…, Skip Record If…, Next Record) and filters in Edit Recipient List › Filter.
You already know how to run a mail merge: connect the Excel file, insert the fields, out come the letters. The trouble starts afterwards. The date shows as 1/15/2026 when you wanted January 15, 2026, the amount as 1234.5, the corporate clause appears in letters to individuals too, and someone asks for “a list with ten clients per page” that Word insists on turning into ten pages.
All of that is fixed behind the scenes, in the fields. Every merge field is a small instruction you can read and edit, like the formula behind an Excel cell. If you haven't done your first merge yet, start with the basic mail merge guide.
Here you learn to format dates and amounts, write rules with data inside them, choose exactly which records go in, and send the result by email.
What you'll learn
- How to read and edit field codes without breaking them
- How to format dates and amounts with the \@ and \# switches
- How to write If… rules with fields and wildcards inside
- How to filter, sort and skip records precisely
- How to put several records on one page with Next Record
Step by step
Show the field codes
Press Alt+F9. Every “Amount” turns into something like { MERGEFIELD Amount }: the word MERGEFIELD, the Excel column name and, optionally, a switch starting with a backslash. Press Alt+F9 again to see the results.
Three more keys: Shift+F9 toggles only the selected field, Ctrl+F9 inserts an empty pair of field braces and F9 updates the selected fields.

Field braces can't be typed on the keyboard: if you type { and } by hand, Word treats them as plain text.
Format dates with \@
After the column name, type \@ and a pattern in quotes: { MERGEFIELD DueDate \@ "MMMM d, yyyy" } gives January 15, 2026. The pieces: d or dd (day), MM (month as a number), MMMM (month name), yyyy (year) and dddd (weekday). Literal text goes in apostrophes, as in "d 'of' MMMM".
If the month comes out in the wrong language, select the field and set its language in Review › Language › Set Proofing Language: month names usually follow the language of the field's text.
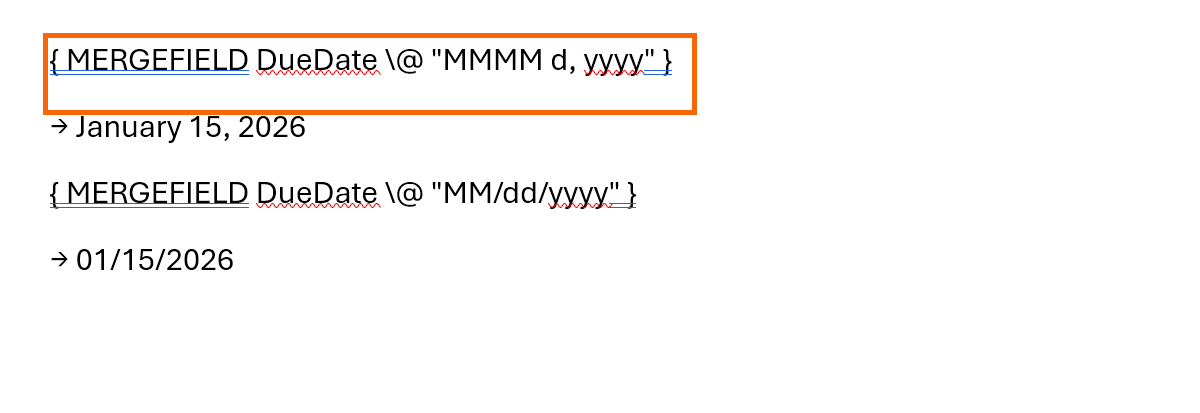
For a legal document: “Dated { MERGEFIELD Date \@ "MMMM d, yyyy" }” gives every letter a date that is ready to sign.
Format amounts with \#
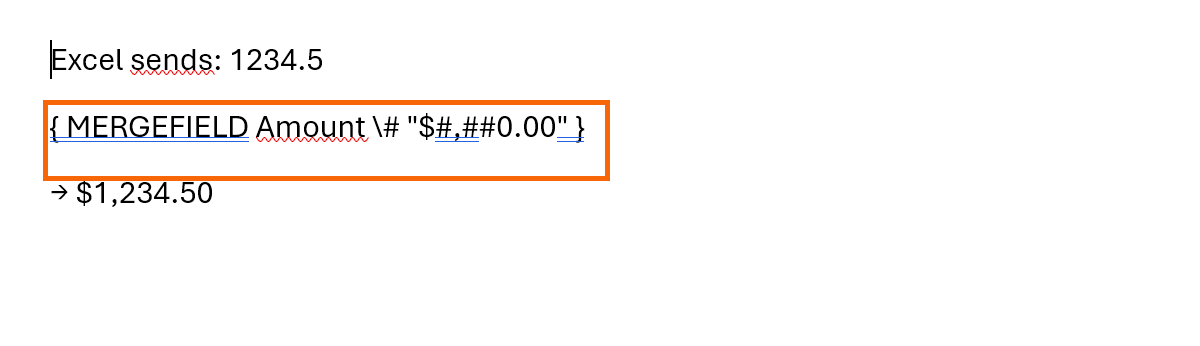
For numbers use \#: { MERGEFIELD Amount \# "$#,##0.00" } turns 1234.5 into $1,234.50. In the pattern, 0 forces a digit (even a zero) and # shows one only when needed. The stray decimals Excel sometimes sends (1234.4999999) get rounded automatically.
Watch your regional settings. The thousands and decimal symbols in the pattern follow Windows regional settings. With US settings, type $#,##0.00; with settings for a country such as Spain, #.##0,00 €. If the result looks odd, try the pattern with the separators swapped.
Need the amount spelled out for a contract? See the guide on numbers in words with fields.
Fix data that arrives wrong from Excel
Word doesn't see cell formatting, only the value underneath. Three typical cases:
- Percentages: a cell that shows 21% arrives as 0.21. Multiply inside Word with a formula field:
{ = { MERGEFIELD Tax } * 100 \# "0%" }. - Mixed columns: if a column holds numbers and text (for example, “Pending”), Word may leave blanks. Keep each column to a single data type.
- Codes with leading zeros (ZIP codes, account IDs): format them as Text in Excel before typing them.
If you'd rather not touch field codes, create a helper column in Excel with the TEXT function and merge that one.

Write If… rules with fields and wildcards inside
Build the rule with Mailings › Rules › If…Then…Else…, then press Alt+F9 to fine-tune it. You can put fields inside the text: place the cursor between the quotes of a result and use Insert Merge Field.
Two expert tricks. To check whether a column is empty, compare it with two quotes in a row: { IF { MERGEFIELD Company } <> "" "…" "…" }. And with = you can use wildcards: * stands for any text and ? for a single character, for example { IF { MERGEFIELD ZIP } = "100*" "Manhattan" "Other areas" }.

The comparison is literal: a stray space in the Excel cell means “Company ” doesn't equal “Company”. Clean up the data first.
Filter and sort precisely
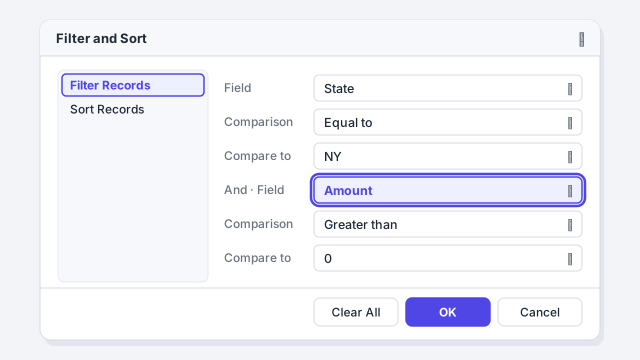
Go to Edit Recipient List › Filter…. The Filter and Sort window opens. On Filter Records you can chain conditions with And or Or: for example, State equal to NY And Amount greater than 0. On Sort Records you choose up to three criteria, such as state and then last name.
There's also Rules › Skip Record If…, which drops records from inside the letter itself. It works, but the filter is clearer: you see how many records are left before you merge.
Put several records on one page with Next Record
By default, each record gets its own letter. For a list (say, a table with four clients per page for an internal report), create a table, put the fields in the first row and, at the start of each following row, insert Rules › Next Record before repeating the fields. That field tells Word “move on to the next record without starting a new page”.
If you just want one continuous list, choose Start Mail Merge › Directory: it adds no page breaks between records.

Send by email or produce the PDFs
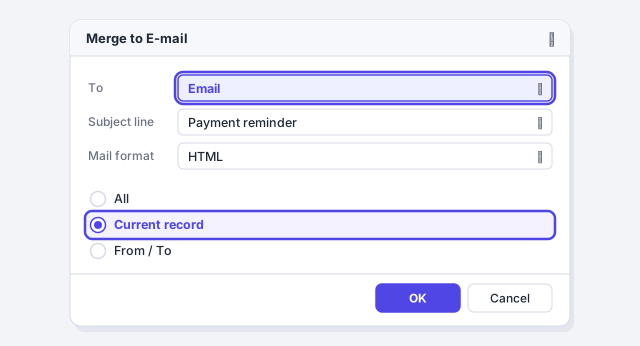
For email, go to Finish & Merge › Send Email Messages…. In To pick the email column, type the Subject line and keep the HTML format. Test first: filter down to a row with your own address or merge only the current record. Messages go out through desktop Outlook, with no CC or BCC.
Word doesn't produce one PDF per person directly. The usual route is Edit Individual Documents… and saving the result as a PDF (one file with every letter). If you need one PDF per client, merge record by record with From… To… or use a macro.
Expert tips
- Always test with three records. Filter or merge records 1 to 3, check dates, amounts and rules, and only then run the full batch.
- Uppercase without touching Excel. The
\* Upperswitch capitalizes the field:{ MERGEFIELD Last_name \* Upper }. Handy in pleading captions and case headers. - Amounts in words. For contracts and invoices, combine the number field with the technique in numbers in words in Word.
- AI drafts, Word decides. Ask ChatGPT or Copilot for both versions of a clause; the If… rule is what guarantees each client gets the right one.
Common mistakes and how to fix them
You add a switch and nothing changes.
Update the field with F9 or click Preview Results again. Also check that the pattern's quotes are straight (") rather than curly.
The amount shows odd separators or no decimals.
The pattern doesn't match your Windows regional settings. Swap the period and comma in the pattern.
Every row of the table shows the same record.
The Next Record field is missing at the start of each row except the first.
An If… rule never matches even though the data looks right.
Check for stray spaces or different capitalization in the Excel cell; the comparison is literal.
Word for Mac has Rules and Filter on the Mailings tab. To show field codes press ⌥+F9, and to insert field braces press ⌘+F9 (on some keyboards with Fn). Sending email requires Outlook as the default mail app.
Frequently asked questions
Where does the switch go if the field already has \* MERGEFORMAT?
Anywhere after the column name. \* MERGEFORMAT only keeps the formatting applied to the field; it can sit alongside \# or \@.
Can I nest several If… rules?
Yes. In the “otherwise” text you can insert another rule with Ctrl+F9. Beyond two or three levels it gets hard to read: consider an Excel column that already holds the decided text.
Why can't I add CC to the emails?
Word's email merge sends each message to a single address, with no CC or BCC. That takes macros or add-ins.
Do filters change my Excel file?
No. Filtering, sorting and skipping records only affect this merge. The Excel workbook isn't modified.
Official sources
Microsoft documentation consulted for this guide.
Saved only in this browser.