Track Changes and comments like a professional
Go to Review › Tracking › Track Changes (or press Ctrl+Shift+E) and Word records every insertion, deletion and formatting change under your name. In Review › Changes you Accept or Reject them, one at a time or all at once. Comments live in Review › Comments › New Comment. Before the final version: accept everything, delete all comments and run Inspect Document.
Someone sends you a contract, you change three clauses and send it back. The other side can't find what you touched, compares it by eye and ends up calling you. Or the reverse: you receive a document full of red strikethroughs and have no idea how to “clean it up” without losing anything. Worst of all: the client opens your file and reads your internal comments.
Track Changes is like writing with a pen that can't erase: every word you add, delete or reformat is marked with your name and the time. Then whoever reviews it decides, change by change: accept or reject. Comments are the notes in the margin. Together they are the professional way to negotiate a text without losing control.
In this guide you set it up properly, use it with confidence and learn the full workflow for sending and receiving versions without surprises.
What you'll learn
- Turn Track Changes on and off (and lock it with a password)
- Pick the right view: Simple Markup, All Markup, No Markup or Original
- Accept or reject changes one by one, all at once, or only one reviewer's
- Insert, reply to, resolve and delete comments
- Deliver a clean final version with no hidden markup or comments
Step by step
Turn on Track Changes
Go to Review › Tracking › Track Changes. The button lights up and, from that moment, everything you type, delete or reformat is recorded. Click it again to turn it off. The shortcut is Ctrl+Shift+E.
In Microsoft 365 the button has an arrow with two options: For Everyone (the usual choice: anyone who edits the file leaves marks) and Just Mine (only your edits are tracked; handy in documents shared on OneDrive).

Right-click the status bar at the bottom and enable “Track Changes”: you'll always see whether it's on or off.
Edit as usual and watch how Word marks it
Type, delete and format as you normally would. Word shows new text underlined and in color, deleted text struck through (or in a balloon in the margin) and formatting changes in a balloon with the detail (“Bold”, “Font: 12 pt”). Each reviewer gets a different color, and hovering over a change shows who made it and when.
If you ask an AI for an alternative wording of a clause, paste it with Track Changes on: the other side sees exactly what you replaced, instead of a brand-new paragraph with no explanation.
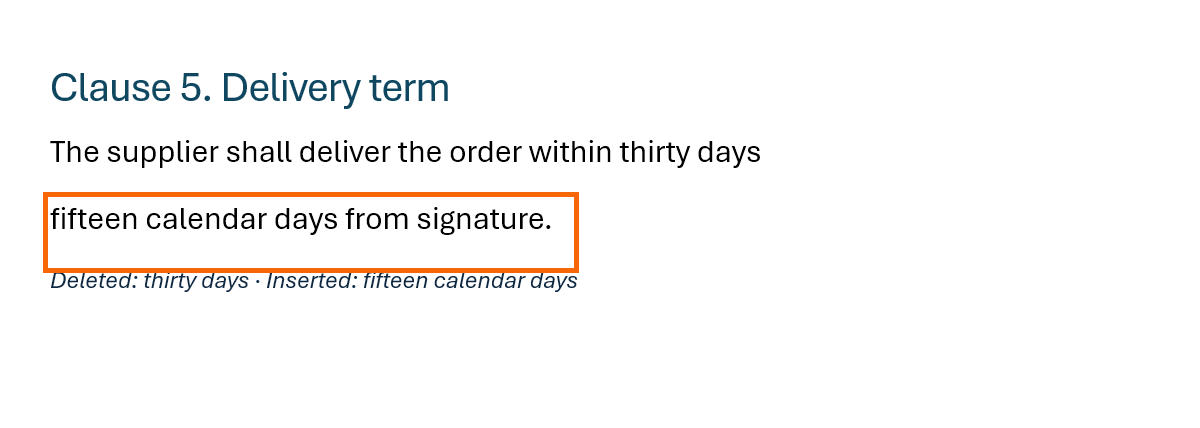
Choose your view: Simple, All, No Markup or Original
Next to the Track Changes button there's a drop-down that usually reads All Markup. It has four views:
- Simple Markup: the text looks clean and a red line in the margin tells you there are changes. Click that line to see the detail.
- All Markup: you see everything, with colors, strikethroughs and balloons. The view for serious reviewing.
- No Markup: shows how the document would look if you accepted everything. The changes are still there, just hidden.
- Original: the document as it was before the changes.

“No Markup” deletes nothing. If you send the file like that, the recipient can switch the view and see every one of your edits.
Decide which marks you see and where: Show Markup and Reviewing Pane
With Review › Tracking › Show Markup you filter what appears on screen: Comments, Insertions and Deletions, Formatting, and under Specific People you can show only one reviewer's edits. Under Balloons choose between Show Revisions in Balloons (in the margin), Show All Revisions Inline (inside the text) or Show Only Comments and Formatting in Balloons, the most comfortable balance.
The Reviewing Pane opens a list of every change with its author, and tells you at the top how many revisions are left. It's the quickest way to know whether the document is clean.
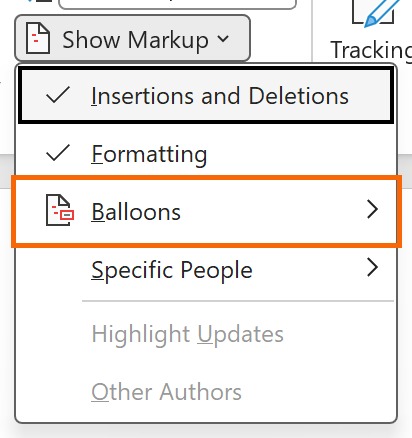
If the document has lots of formatting changes you don't care about, untick “Formatting” in Show Markup and review only the text.
Accept or reject changes: one at a time, all, or only those shown
Put the cursor on the first change (or use Review › Changes › Next) and click Accept or Reject. Word applies your decision and jumps to the next change. You can also right-click a change and pick Accept or Reject right there.
The arrow under Accept hides the real time-savers: Accept All Changes, Accept All Changes Shown (only those passing the Show Markup filter, for example one reviewer's) and Accept All Changes and Stop Tracking. The Reject button has the same variants.
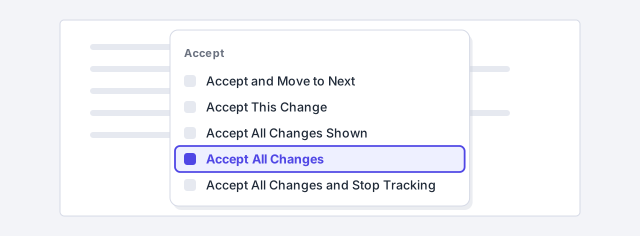
Combine “Specific People” with “Accept All Changes Shown” to accept everything your colleague did in one go and review the other party's proposals calmly.
Use comments to ask questions without touching the text
Select the word or sentence and go to Review › Comments › New Comment. Type and click the post button (or press Ctrl+Enter). The comment appears in the margin with your name. Whoever reads it can Reply underneath (forming a thread) and, once the matter is closed, mark it Resolve: the thread fades but doesn't disappear.
To move around use Previous and Next in the Comments group. To remove one, select it and click Delete; its arrow offers Delete All Comments in Document and Delete All Resolved Comments.

A comment is for questions and proposals (“do we include VAT?”); a tracked change is for text you already want in the contract. Don't mix the two.
Make sure the changes carry your name
Word signs every change and comment with the name from File › Options › General, section Personalize your copy of Microsoft Office: fields User name and Initials. If you're signed in to Microsoft 365, Word uses your account name; tick Always use these values regardless of sign in to Office to force the one you type here.
Do it before you start: changes already made keep the name they were created with.
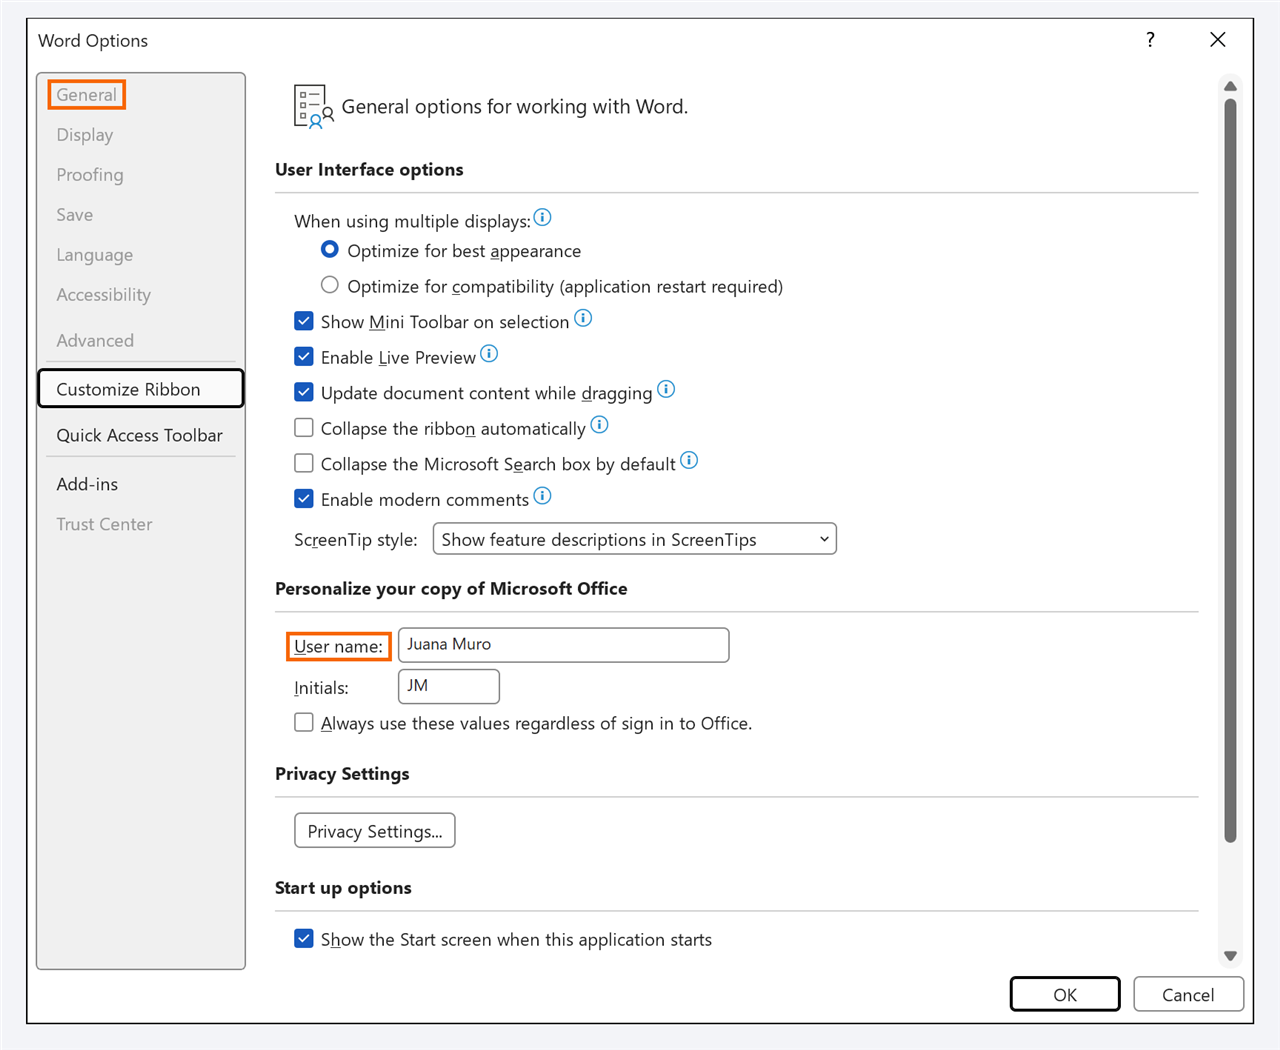
If changes show up as “Author” or a generic name, nobody filled in this field. In a document going to a client, it looks unprofessional.
Lock tracking with a password
When you send a document, nothing stops the recipient turning Track Changes off and editing without a trace. To prevent it, open the arrow under Track Changes and choose Lock Tracking. Enter a password (optional, but without one anyone can unlock it) and confirm it. The button stays on and greyed out: it can no longer be switched off without the password.
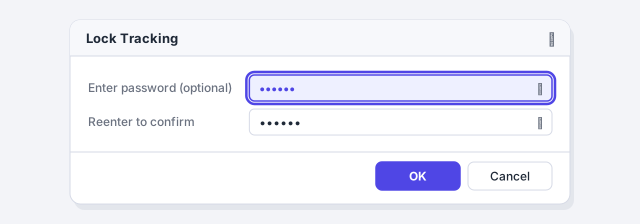
This doesn't encrypt the file or stop editing: it only guarantees every edit is recorded. To genuinely restrict editing, see the guide on protecting the document.
Deliver a clean final version (the workflow with a client or the other party)
The usual cycle: you turn on tracking, edit, send; the other party accepts, rejects and adds their own changes and comments; it comes back to you and you repeat until it's settled. Once the text is agreed, prepare the final version in three steps:
- Review › Changes › Accept › Accept All Changes and Stop Tracking.
- Review › Comments › Delete › Delete All Comments in Document.
- File › Info › Check for Issues › Inspect Document: tick Comments, Revisions, and Versions, click Inspect and then Remove All on whatever it finds.
Save under a new name (“Contract_v3_final”) and keep the marked-up version in case there's ever a dispute about who proposed what.

If you receive a version with no markup and suspect something was touched, use Review › Compare against your last copy: Word builds a document with every difference shown as a tracked change.
Expert tips
- Read in Simple Markup, decide in All Markup. The simple view lets you read the text straight through; when you hit a red line, switch to All Markup and resolve it.
- Right-click a balloon to accept or reject without going up to the ribbon. In a forty-page contract that saves hundreds of mouse trips.
- AI shortcut: ask ChatGPT or Copilot to rewrite a clause, paste it over the original with tracking on and review each change as if it came from a colleague. Never bulk-accept generated text without reading it.
- Compare rescues forgotten tracking. If someone edited without Track Changes, compare the two versions and you get the differences marked up exactly as if it had been on.
- Mentions in comments. If the file lives on OneDrive or SharePoint, type @ and a colleague's name inside the comment: they get an email with a direct link to that spot in the document.
Common mistakes and how to fix them
You sent the document in “No Markup” view thinking it was clean, and the client saw all your edits and internal comments.
The view only hides. Before sending: accept all changes, delete all comments and run Inspect Document. Check in the Reviewing Pane that it reports zero revisions.
Changes show up under the name “Author” or someone else's name.
Go to File › Options › General and type your name under User name. If you're signed in, tick “Always use these values regardless of sign in to Office”.
The other party turned Track Changes off and edited the contract without it showing.
Before sending, use Track Changes › Lock Tracking with a password. If it has already happened, use Review › Compare between your version and the one you received.
You accepted all changes and regret it.
Press Ctrl+Z right away: Word undoes the bulk accept. If you've already closed the file, recover the earlier version from OneDrive's version history or from your marked-up copy.
In Word for Mac the path is the same: Review › Track Changes (a toggle switch), the same view drop-down, Show Markup, Accept and Reject, with the shortcut ⌘+Shift+E. To lock tracking with a password go to Review › Protect › Protect Document and choose “Tracked changes”. The user name is set under the Word menu › Preferences › User Information.
Frequently asked questions
How do I remove Track Changes from a document for good?
Turning the button off or switching the view isn't enough: every change has to be accepted or rejected. The fast way is Review › Changes › Accept › Accept All Changes and Stop Tracking, then delete the comments.
Can I see only one person's changes?
Yes. Under Show Markup › Specific People untick the other reviewers. Then Accept All Changes Shown acts only on that person's edits.
What's the difference between Track Changes and Compare?
Track Changes records edits as they happen. Compare takes two finished files and works out the differences afterwards. If someone forgot to turn tracking on, Compare is your lifeline: guide to comparing documents.
Do tracked changes show up when I export to PDF?
The PDF shows what you see on screen. If you export with markup visible, the PDF includes it. Clean the document first or switch to No Markup before exporting. More in exporting to PDF without hidden information.
Does this work in Word for the web?
Yes: Review › Track Changes, with the For Everyone and Just Mine options, and the same comments. What you won't find there is Lock Tracking or Inspect Document; for those, open the file in the desktop app.
Official sources
Microsoft documentation consulted for this guide.
Saved only in this browser.