Alphabetical index: mark entries and generate it
An alphabetical index is built in two phases. First you mark each term: select it and go to References › Index › Mark Entry (Alt+Shift+X); Word inserts a hidden XE field. Then place the cursor at the end of the document and use References › Index › Insert Index to generate it. When the text changes, References › Index › Update Index recalculates the page numbers. Turn off formatting marks (¶) before generating, or the page numbers will be wrong.
You have a 200-page manual, a book or a legal digest, and the publisher or the client wants the usual thing: at the back, an alphabetical list of terms with the pages where each one appears. Doing it by hand is torture: you edit a paragraph, the pages shift and the index is wrong again. And AI will give you a list of words, but it will never know which page each one lands on.
Word has a tool for this, and it is not the table of contents. The table of contents is the map of the document: your headings, in order, with their page, built from heading styles. The index is the dictionary: terms from A to Z with the pages where they are mentioned, and it needs you to say which words matter. You do that by “marking entries”: invisible tags attached to each term. Then Word generates the index, sorts it and refreshes it whenever you ask.
What you'll learn
- The real difference between a table of contents and an index
- How to mark entries, subentries and “See” cross-references with References › Index › Mark Entry
- What XE fields are, why they are hidden text and why you must hide them before generating
- How to insert, update and fix the index, and mark hundreds of terms with a concordance file
Step by step
Understand the workflow: mark first, generate later
A Word index has two separate parts. The entries are fields called XE (for index entry) that Word hides next to each marked term. The index is a single field that reads every XE, sorts them alphabetically and writes the page numbers. When you change the text you never touch the index: you update it and it recalculates.
That is why order matters: first you mark entries throughout the document, and at the end you generate the index.

Select the term and open “Mark Entry”
Select the word or phrase in the text (for example penalty clause) and go to References › Index › Mark Entry. The Mark Index Entry dialog opens with the selected text already copied into Main entry. The Windows shortcut is Alt+Shift+X.
The dialog can stay open: click in the document, select another term and come back to it. That way you mark dozens of entries in a row.

Edit the Main entry text before marking: if the text says “penalty clauses”, type “penalty clause” so every mention is grouped under one entry.
Set the main entry, the subentry, and Mark or Mark All
Main entry holds the term exactly as you want to read it in the index. To group concepts, type the category in Main entry and the detail in Subentry: Contract › termination. For a third level, separate with a colon inside Subentry: termination:unilateral.
Mark inserts the entry only at that mention. Mark All searches the whole document for the same text and marks the first occurrence in each paragraph. It is convenient, but it is case-sensitive and does not recognize plurals.

“Mark All” also marks mentions you may not want indexed, such as a passing reference. For very common terms, mark by hand.
Add “See” cross-references and page number formatting
Under Options you have three choices. Current page is the normal one: the entry points to the page it sits on. Cross-reference adds no page number: it redirects to another entry, for example See Rescission (Word pre-fills “See”). Use it for synonyms. Page range points to a bookmark spanning several pages and shows “12-15”.
Under Page number format you can tick Bold or Italic: the publishing convention for highlighting the page where a term is defined rather than merely mentioned.

Look at (and then hide) the XE fields
When you mark an entry, Word switches on formatting marks and shows { XE "Contract:termination" } next to the term. That is the XE field, formatted as hidden text: it never prints, but it takes up space on screen while visible. Show or hide it with Ctrl+Shift+8 or the ¶ button in Home › Paragraph.
The trap: if you generate or update the index while the fields are visible, Word paginates counting that hidden text and the page numbers come out shifted. Hide the marks before generating. If they won't disappear, go to File › Options › Display and untick Hidden text.

You can fix an entry by editing the quoted text inside the XE field, as if it were normal text. The change shows up when you update the index.
Insert the index at the end of the document
Put the cursor on a new page at the end (Ctrl+Enter) and go to References › Index › Insert Index. In the Index dialog you choose: Type Indented (each subentry on its own line, the usual choice) or Run-in (subentries strung together, saves space); Columns (2 is the classic); Right align page numbers with its Tab leader; Formats, where From template uses the Index 1, Index 2… styles of your document; and Language, which sets the alphabetical sorting rules.
Click OK and Word generates the complete index, with the See references and grouped page numbers.
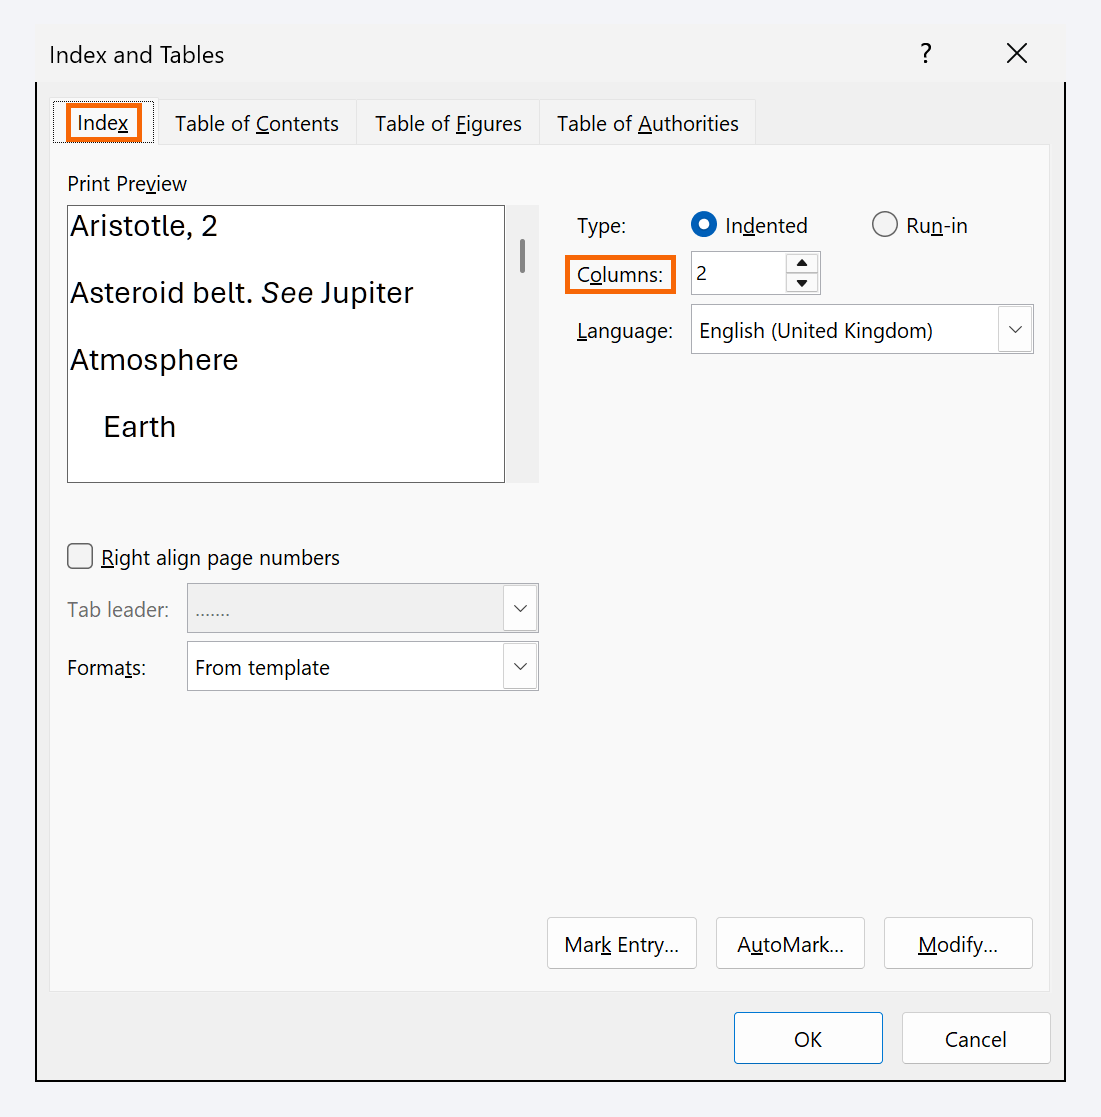
Word does not add a heading to the index. Type “Index” above it in Heading 1 style so it also shows up in the table of contents.
Update the index and remove entries you don't want
Whenever you change the text or mark new entries, click inside the index and press References › Index › Update Index (or F9). Hide the ¶ marks first.
To remove an entry, do not delete the line in the index: it would come back on the next update. Show the marks, select the whole { XE "…" } field (braces included) next to the term and press Delete. To remove them all at once, open Home › Editing › Replace, type ^d XE in Find what, leave Replace with empty and click Replace All.

If you edit the index by hand, you lose the changes on the next update. Always fix the XE fields instead.
Mark hundreds of terms at once with a concordance file
For a technical manual or a digest with many terms, create a new document with a two-column table: on the left, the exact text Word should look for (penalty clause); on the right, how it should read in the index (Contract:penalty clause creates a subentry). One row per term. Save it as concordance.docx.
In the main document go to References › Index › Insert Index › AutoMark…, pick that file, and Word marks the first occurrence of each term in every paragraph. Then insert or update the index. This is where AI fits in: ask ChatGPT or Copilot for the table of terms, paste it into Word and trim what you don't need.

Matching is case-sensitive: if the text contains both “Clause” and “clause”, add both variants as separate rows pointing to the same entry.
Expert tips
- Technical manual: index commands and errors. Readers look up “Error 0x80070005” or a menu name, not concepts. Use a concordance file and make the page where each one is explained bold.
- Book: standardize proper names. Mark “García Márquez, Gabriel” as the main entry even if the text says “Gabriel García Márquez”: edit the field before clicking Mark and every mention is grouped together.
- Legal digest: subjects and categories. Main entries by subject (Dismissal), subentries by category (unfair, void) and cross-references between synonyms. For citing cases and statutes the tool is a different one: the table of authorities.
- Page ranges with a bookmark. If a concept spans five pages, select the block, go to Insert › Links › Bookmark, name it and, when marking the entry, choose Page range and that bookmark. The index shows “12-16”.
Common mistakes and how to fix them
The page numbers in the index don't match the document.
Formatting marks (¶) were on when you generated it, so the hidden XE text shifted the pagination. Press Ctrl+Shift+8 to hide them and update with F9.
The index shows “Contract” and “contract” as two different entries.
Entries are case-sensitive. Show the marks, fix the quoted text inside the XE fields so it is identical, and update.
You delete a line from the index and it comes back after updating.
The index is rebuilt from the XE fields. Find the field next to the term in the text, delete all of it (braces included) and update again.
In Word for Mac the buttons are on the References tab (Mark Entry, Insert Index, Update Index) and also in the Insert menu › Index and Tables… › Index tab, where AutoMark lives. The shortcut to mark an entry is ⌘+⌥+⇧+X, and ¶ marks are shown or hidden with ⌘+8.
Frequently asked questions
What is the difference between a table of contents and an index?
A table of contents lists the headings in order, at the front, and builds itself from heading styles. An index lists terms alphabetically, at the back, and only includes what you mark. A serious book has both: how to create an automatic table of contents.
Can Word generate the index by itself, without me marking anything?
No. Word has no idea which words matter. The closest thing is the concordance file in step 8: you supply the list (or ask AI for it) and Word does the marking.
Do XE fields print or show up in the PDF?
No, as long as they are hidden when you print or export. Hide the marks with Ctrl+Shift+8 before you export to PDF.
How do I put the index in two columns while the rest stays in one?
With the Columns setting in the Index dialog. Word inserts continuous section breaks before and after so only that part runs in two columns.
Official sources
Microsoft documentation consulted for this guide.
Saved only in this browser.